Set to VoIP
Forward your FlyNumber's incoming calls to any SIP/VoIP endpoint — your own PBX, a hosted VoIP provider, or an AI voice platform. Incoming minutes stay unmetered for regular FlyNumbers, and the audio never leaves the IP world (no PSTN per-minute charges on the inbound leg).
Toll-free and "Metered" FlyNumbers carry a per-minute incoming rate that applies no matter how you receive calls — VoIP forwarding, FlyNumber SIP, phone forwarding, or the phone system. See toll-free incoming rates for the current breakdown.
You can also opt the forwarding leg into TLS + SRTP encryption — see Encryption coverage below for what that protects and what it can't.
With AI voice agents now everywhere, FlyNumbers commonly point at platforms like VAPI, LiveKit, ElevenLabs, and Retell for automated customer interactions, appointment scheduling, and support flows.
Setting it up
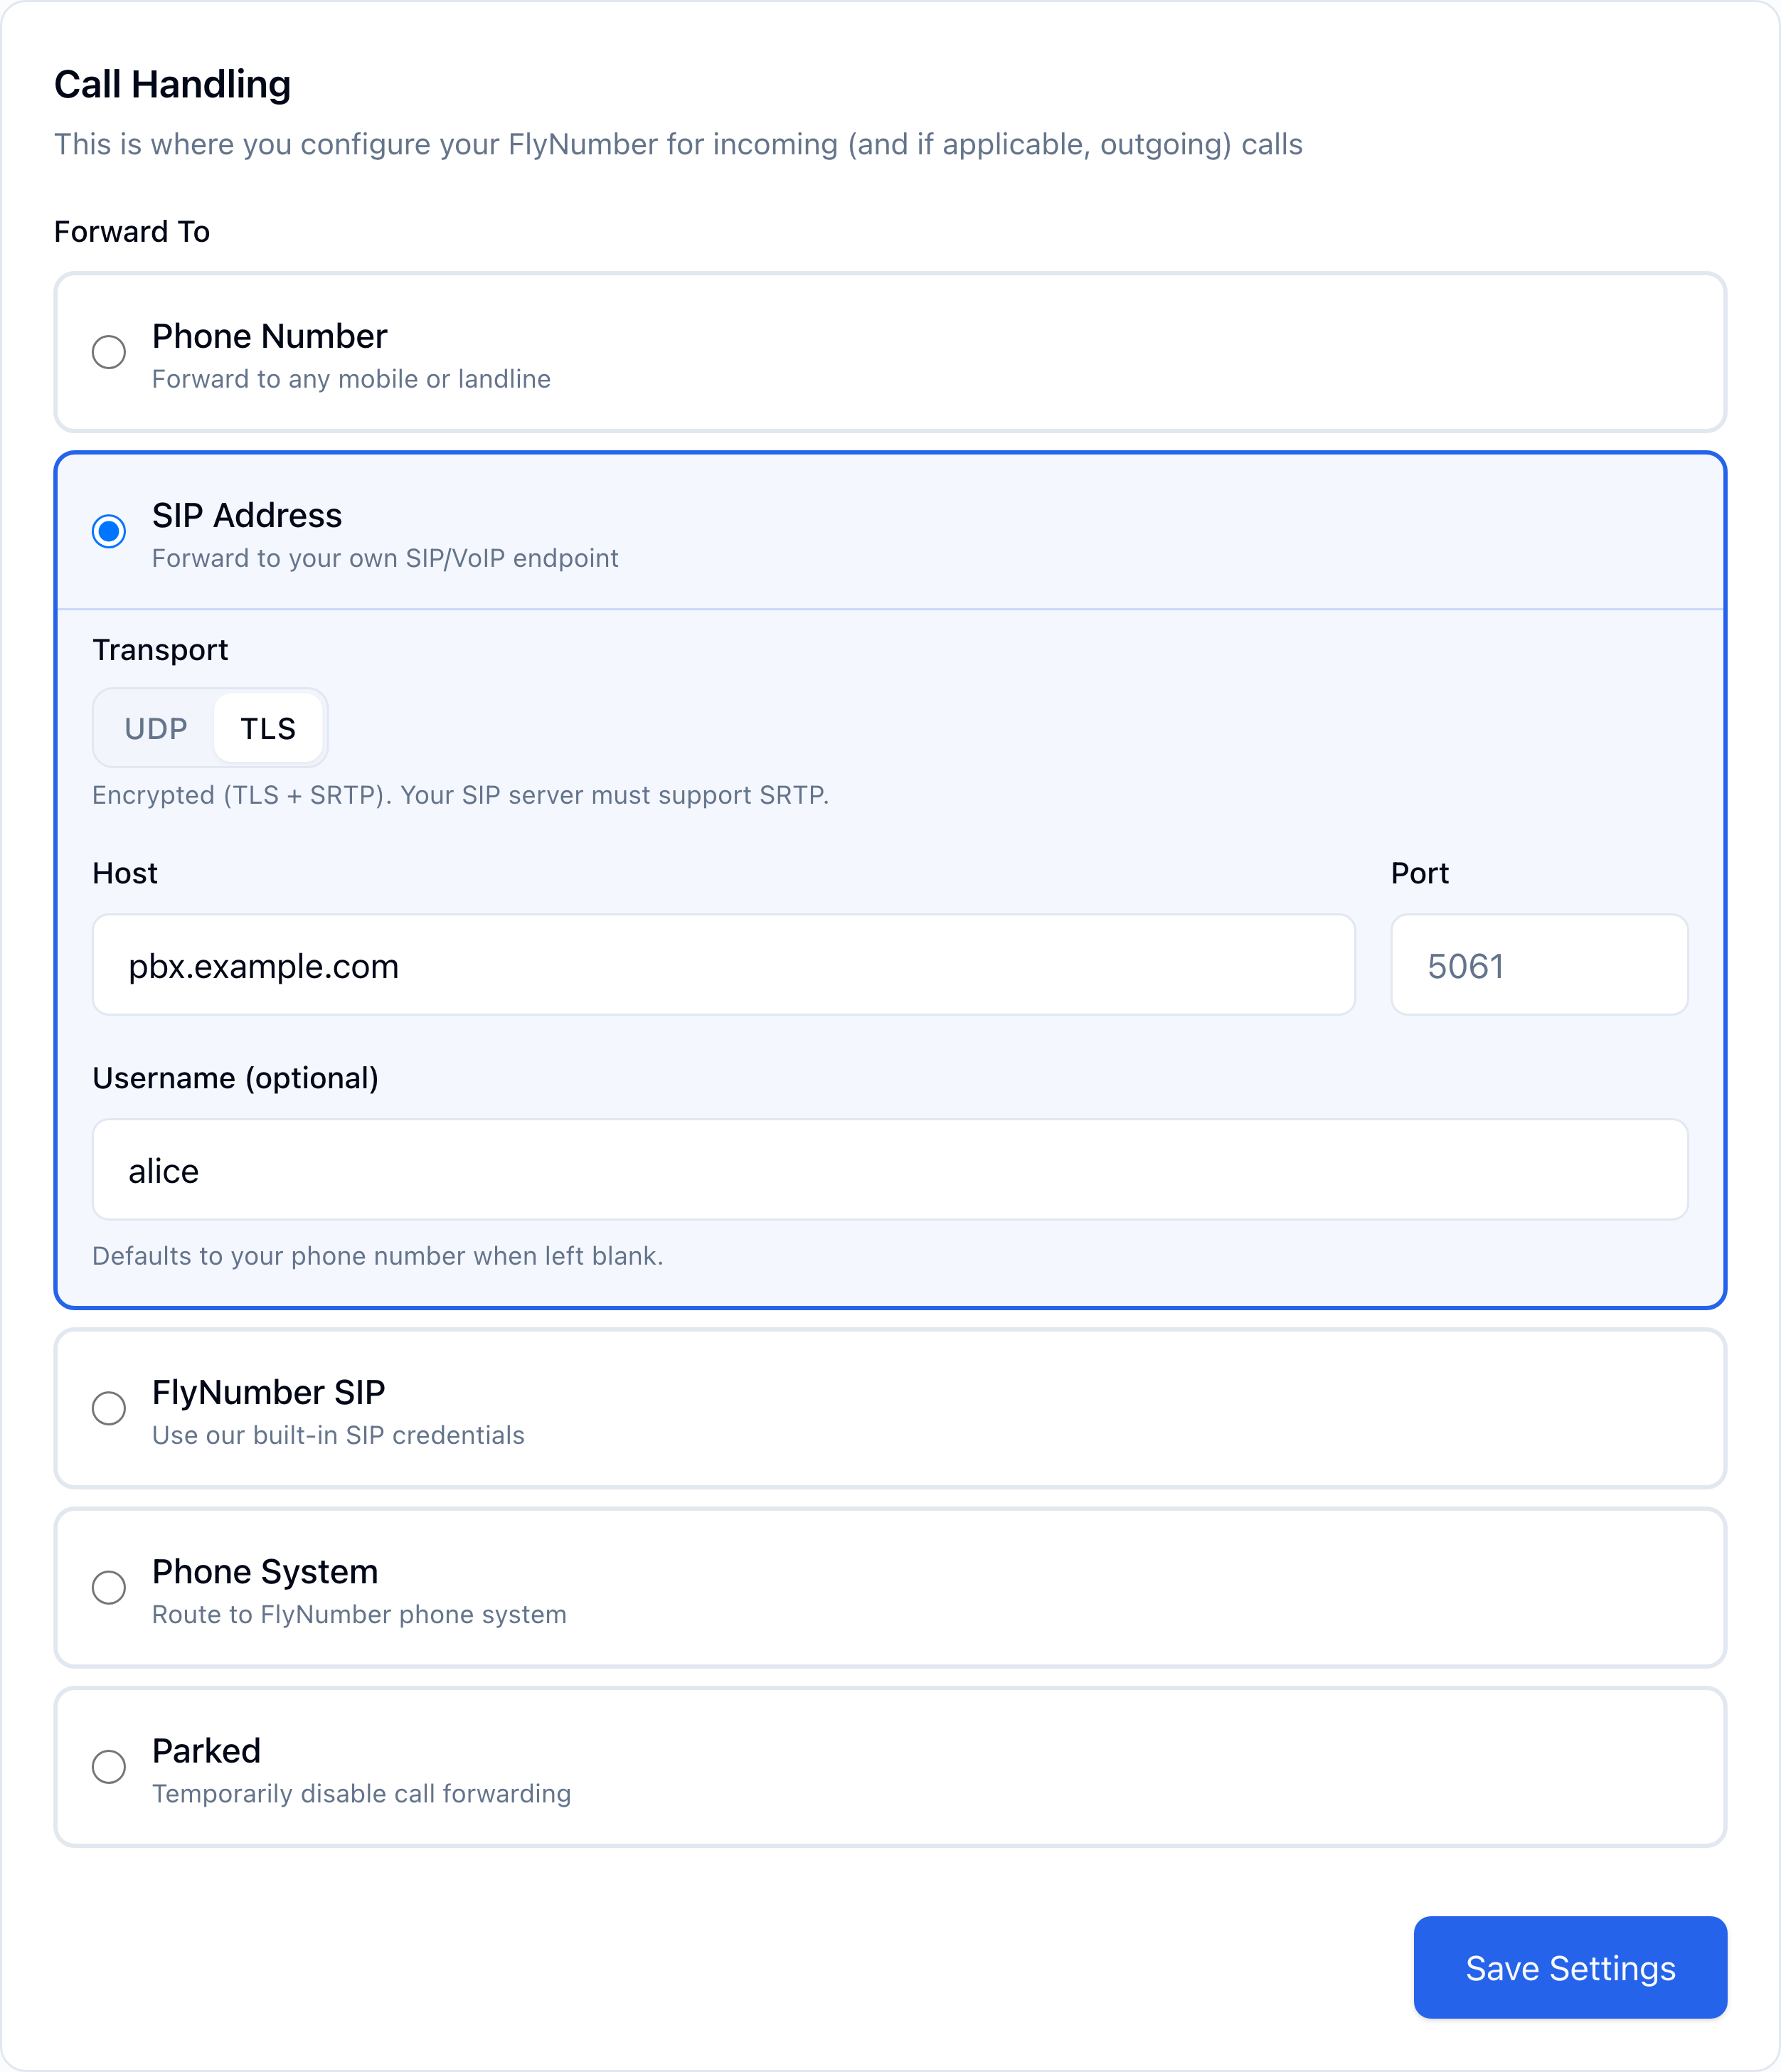
You can pick SIP Address as your forwarding type two ways: when you first add a FlyNumber, or anytime afterwards from the number's detail page. Either way the form has four fields — Transport, Host, Port, and Username — and you click Save Settings.
When you add a FlyNumber
In the Add FlyNumber flow, the Call handling step asks how you want to handle incoming calls. Choose SIP Address, fill out the form (see the Field reference below), and continue. Every field is editable from the panel later.
From an existing FlyNumber
To switch a number to VoIP forwarding, or update the destination:
- Open My FlyNumbers in the sidebar (or panel.flynumber.com/my-flynumbers).
- Click the number you want to update.
- In the Call Handling card, select SIP Address.
- Fill out Transport, Host, Port, and Username (see the Field reference below).
- Click Save Settings.
The change takes effect as soon as you save. Active calls aren't interrupted.
Field reference
The SIP Address form has four fields. Two are required (Transport, Host); two are optional (Port, Username).
Transport — UDP or TLS
- UDP is the default. Fastest path; works with the vast majority of SIP servers and softphones. Signaling and audio travel unencrypted.
- TLS encrypts the leg between FlyNumber and your endpoint. Signaling runs over TCP+TLS 1.2/1.3, and audio is encrypted with SRTP (using the standard SDES key exchange). Your SIP server must support SRTP for TLS to work — if it doesn't, the call fails to connect. See Encryption coverage below for the full picture.
Host
Your SIP server's hostname or IP address. Accepted formats:
| Type | Example |
|---|---|
| Fully-qualified domain | pbx.example.com, sip.acme.com |
| IPv4 | 12.34.56.78 |
| IPv6 (bracketed) | [2001:db8::1] |
Single-label hosts like localhost or intranet are rejected — the host needs a proper TLD.
Port
The port your SIP server listens on. Leave this blank unless your destination uses a non-standard port. With Port blank, FlyNumber routes the call using the DNS records your SIP destination publishes — which is exactly what hosted services like sip2sip.info, Twilio Elastic SIP Trunking, voip.ms, and most modern providers expect.
Typing the standard ports — 5060 (UDP) or 5061 (TLS) — is treated the same as leaving Port blank. Only a non-standard port (e.g., 6060 on an internal PBX you've explicitly configured) overrides DNS routing and connects directly to that port on the Host.
| Setup | What to put in Port |
|---|---|
| Hosted SIP service (sip2sip.info, Twilio, voip.ms, etc.) | Leave blank |
| Self-hosted PBX on the standard port (5060/5061) | Leave blank |
| Self-hosted PBX on a non-standard port | The non-standard port, e.g., 6060 |
Entering a hosted SIP service's domain with a non-standard port. Hosted services route by DNS — if you hardwire a port that isn't standard, FlyNumber bypasses discovery and tries to connect directly to the domain's IP on your port. Most hosted-service domains don't answer SIP traffic at their public IP, so calls fail in about 100 milliseconds.
If you're using a hosted service, leave Port blank.
Why "leave Port blank" is the right default
SIP destinations publish DNS records (specifically SRV records) that tell calling systems where to actually deliver traffic. A hostname like sip2sip.info might resolve to multiple geographically distributed servers, with different ports for UDP, TCP, and TLS — and the SRV record describes all of that.
When the calling system has an explicit non-standard port in the URI, the SIP standard (RFC 3263) says skip the SRV lookup entirely and connect directly to the hostname's IP on that port. For most hosted services, that IP doesn't accept SIP at all (it's the website server). Leaving Port blank lets the destination's DNS routing do its job.
sip2sip.info's own documentation puts it bluntly: "You must never set manually a host address or transport... your device must use DNS lookups." This pattern is increasingly common because providers want to add servers, change regions, or rotate IPs without every customer having to update their settings.
Username
Optional. The user part of the SIP address that ends up in the outbound INVITE (the bit before the @). Leave it blank and FlyNumber uses your phone number as the username. Fill it in when your SIP server expects a specific username — common for extensions on a PBX, or named accounts on hosted services.
| Setup | What to put |
|---|---|
| Hosted SIP service (sip2sip, Twilio, etc.) | Your account username (the part before @ in your SIP address). Leave blank if you want FlyNumber to forward as your phone number. |
| Self-hosted PBX with extensions | The extension number (e.g., 101) |
| AI voice platform | Your FlyNumber in E.164 (e.g., +13025551234) — see the examples below |
Only letters, numbers, dot, underscore, plus, and hyphen are accepted (max 64 characters).
Encryption coverage
When you pick TLS as the transport, FlyNumber protects the call between us and your SIP server. Worth knowing exactly what that means.
What TLS gives you:
- Signaling — SIP messages between FlyNumber and your endpoint travel over TCP with TLS 1.2 or 1.3.
- Media — Audio (RTP) is encrypted with SRTP. Keys are exchanged via SDES — the most widely-supported form of SIP media encryption.
What TLS does NOT give you:
- Encryption from the original caller. The leg from the calling phone (cell tower, landline) through the public phone network to FlyNumber is unencrypted. This is a fundamental limitation of any service connected to the phone network — not specific to FlyNumber.
- Strict server certificate validation. We don't reject your server based on certificate hostname mismatches or self-signed certs. The TLS handshake just needs to succeed.
- Mutual TLS or SIP authentication. We connect anonymously. Your server can't verify FlyNumber's identity at the TLS layer, and we don't send Authorization headers in our INVITEs. If your server requires SIP digest auth, see Need authenticated SIP? below.
Compatible clients and servers
If your client or server supports SRTP or SDES (sometimes labeled "encrypted media" or just "SRTP" in the UI), it works with TLS forwarding. The major softphones and platforms all support it out of the box:
| Client / server | SRTP-SDES support |
|---|---|
| Linphone | ✅ Built in |
| Bria (Counterpath) | ✅ Built in |
| Zoiper | ✅ Built in |
| MicroSIP | ✅ Built in |
| Asterisk | ✅ Configurable |
| FreeSWITCH | ✅ Built in |
| 3CX | ✅ Built in |
| FreePBX | ✅ Configurable |
Not supported: ZRTP and DTLS-SRTP. Some softphones (a few Linphone builds, for example) try ZRTP first by default — if yours does, disable ZRTP and explicitly enable SDES in your client's media settings. Otherwise the call connects briefly and drops after a few seconds.
Need authenticated SIP? Use FlyNumber SIP instead
Some providers and AI platforms expect a registered SIP connection rather than anonymous IP-based forwarding — meaning the connection has to log in with credentials before SIP traffic is accepted. The four fields above don't cover this case; they connect to your endpoint anonymously.
The cleanest workaround is to flip the relationship: instead of FlyNumber pushing calls out to a credential-protected endpoint, have your endpoint register to FlyNumber and pull calls down that registered connection. In the Call Handling card, pick FlyNumber SIP — we'll issue a set of SIP credentials your softphone, PBX, or AI platform can register with. No anonymous SIP exposure on your side, no IP whitelist to maintain.
See FlyNumber SIP for setup details.
- Your provider requires registered/authenticated SIP and doesn't accept anonymous traffic
- You're connecting an AI voice agent platform (VAPI, ElevenLabs, Retell, Bland AI) — many of these work either via URI-based forward-to-SIP (see the examples below) or registered SIP, and registered is often simpler to wire up
- You're connecting a hosted PBX that demands authentication
- You don't want to publish your SIP server publicly or maintain an IP whitelist
Behind the scenes
A couple of technical details the panel doesn't expose directly:
Protocol — SIP is what we use for all new setups. We still accept H.323 for legacy interop, but it's effectively deprecated in the wider VoIP world; new configurations should be SIP.
IAX2 is being decommissioned by the end of 2025. If you're still on IAX2, click Contact in the panel sidebar to migrate to SIP.
SIP registration is often needed when connecting to:
- AI voice agent platforms (VAPI, ElevenLabs, Retell, Bland AI)
- Hosted PBX systems that require authenticated connections
- VoIP providers without IP whitelisting options
Technical Specifications
IP Addresses
Forwarded calls — both SIP signaling and RTP media — originate from a single FlyNumber server:
sip.flynumber.com—138.197.42.26
If your SIP server or platform filters by source IP (an "allowed addresses" list, ACL, or firewall rule), allow 138.197.42.26. When this IP isn't allowed, calls may appear to ring but never connect.
RTP media:
- Source IP:
138.197.42.26 - Port range: 16384-32768 (UDP)
Supported Codecs
- G.711 U-law (PCMU)
- G.711 A-law (PCMA)
DTMF Transport
- RTP telephone-event (RFC 4733, formerly RFC 2833)
Popular Integration Examples
AI Voice Platforms
AI voice agents are increasingly popular for handling customer calls, scheduling appointments, and providing 24/7 support. Here are common platforms:
| Platform | Transport | Registration | Notes |
|---|---|---|---|
| VAPI | UDP, TCP, TLS | Not required | UDP is default; see VAPI example below |
| LiveKit | UDP, TCP, TLS | Not required | Open-source agent runtime; see LiveKit example below |
| ElevenLabs | TLS required | Not required | UDP not supported; TLS is a requirement |
| Retell AI | TCP, TLS | Varies | Check provider docs |
| Bland AI | TCP, TLS | Varies | Check provider docs |
The Transport column lists what each platform accepts. On the FlyNumber side the Transport toggle offers UDP and TLS — pick whichever of those the platform supports (plain TCP isn't offered).
For AI platform integration, you'll typically need:
- Configure your FlyNumber to forward to the platform's SIP address
- Set the Transport toggle (UDP or TLS) in the Call Handling card to match the platform's requirement
- If the platform restricts by source IP, add our server (
138.197.42.26) to its allowed addresses - Set up SIP registration if required by the platform
VAPI Example
VAPI uses a SIP trunk model where each trunk gets a unique credential ID (a UUID). Calls are routed to VAPI using a SIP URI in this format:
+{your_flynumber}@{credential_id}.sip.vapi.ai
To connect your FlyNumber to a VAPI AI assistant:
- In your VAPI dashboard, create a BYO SIP Trunk (not a standard credential — choose the "Bring Your Own" option)
- Add the FlyNumber gateway IP as a gateway in the trunk configuration:
138.197.42.26
- On the gateway, enable Inbound Calls and Options Ping — this allows VAPI to accept and monitor incoming calls from FlyNumber
- VAPI will generate a credential ID (a UUID) for the trunk
- Add your FlyNumber as a phone number resource in VAPI and link it to your assistant
- In your FlyNumber SIP forwarding settings, configure the fields as follows:
| Field | Value |
|---|---|
| Host | {credential_id}.sip.vapi.ai (replace with your actual credential ID) |
| Username | Your FlyNumber in E.164 format (e.g., +13025551234) |
- Set the Transport toggle in your FlyNumber settings to match your VAPI trunk configuration (VAPI's default is UDP)
A standard VAPI SIP trunk credential won't work with FlyNumber. You must use the BYO (Bring Your Own) SIP Trunk option and add the FlyNumber gateway IP (138.197.42.26) as a gateway with inbound calls enabled. Without this, calls will return "Service Unavailable."
VAPI does not require SIP registration. Calls are authenticated through the credential ID embedded in the SIP URI itself, so no username/password registration setup is necessary on the FlyNumber side.
LiveKit Example
LiveKit is an open-source realtime platform commonly used to build voice AI agents. Calls from your FlyNumber are delivered to a LiveKit room where one or more agents can answer and interact with the caller. Each LiveKit Cloud project exposes its own SIP URI, shown on the Project settings page — it looks like:
{project}.sip.livekit.cloud
The LiveKit side needs three pieces in place before a call completes: an inbound trunk that lists your DID, a dispatch rule that routes matching calls into a room, and an agent subscribed to that room. Skip any of these and the call fails even if FlyNumber is pointed correctly.
Step 1 — Grab your SIP URI
In the LiveKit Cloud dashboard, open Project settings and copy the SIP URI (for example, abcd1234.sip.livekit.cloud). Strip the sip: prefix if present — what's left is the host you'll hand to FlyNumber.
Step 2 — Create the inbound trunk
Navigate to Telephony → SIP trunks → Create new trunk. On the Trunk details tab, set Trunk direction to Inbound, enter your FlyNumber in E.164 under Numbers (comma-separated if you're attaching more than one), and leave Allowed addresses empty unless you actually want to IP-restrict the trunk.
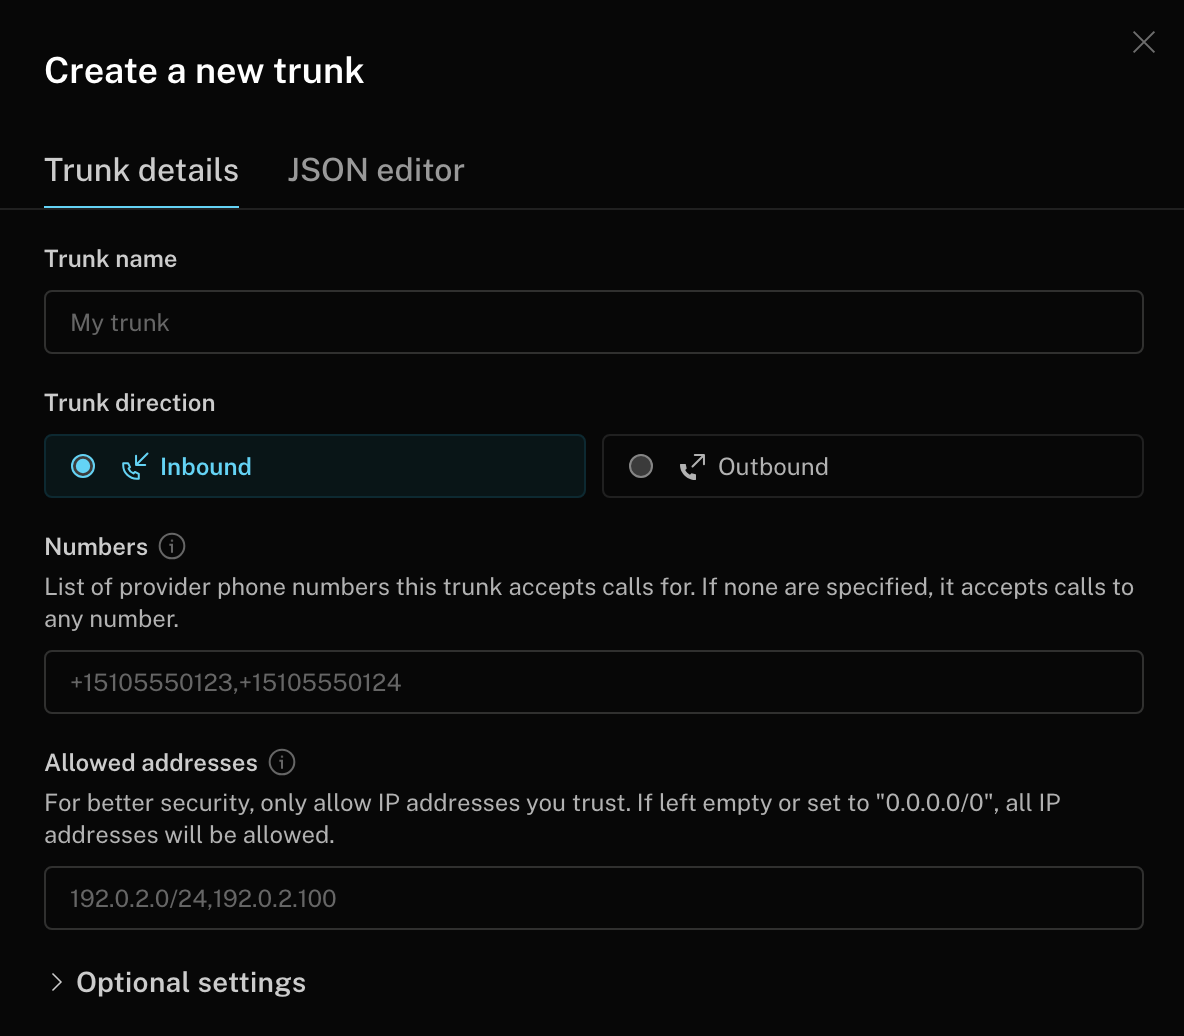
Figure 3: Inbound trunk configuration in the LiveKit Cloud dashboard. The Numbers field must contain the FlyNumber that will forward into this trunk.
Prefer the JSON editor?
Switch to the JSON editor tab on the same Create trunk dialog and paste:
{
  "trunk": {
    "name": "FlyNumber inbound",
    "numbers": ["+17185301799"]
  }
}
If numbers is empty and you haven't set allowedAddresses or auth credentials, LiveKit rejects the trunk. A wildcard trunk needs one of those guard rails in place.
Step 3 — Create the dispatch rule
Head to Telephony → Dispatch rules → Create new dispatch rule. Pick Individual as the rule type and set a room prefix (for example, call-). Each incoming call lands in a freshly generated room with that prefix. Leave Inbound routing on Phone numbers / all trunks unless you want to scope the rule to specific DIDs or trunks.
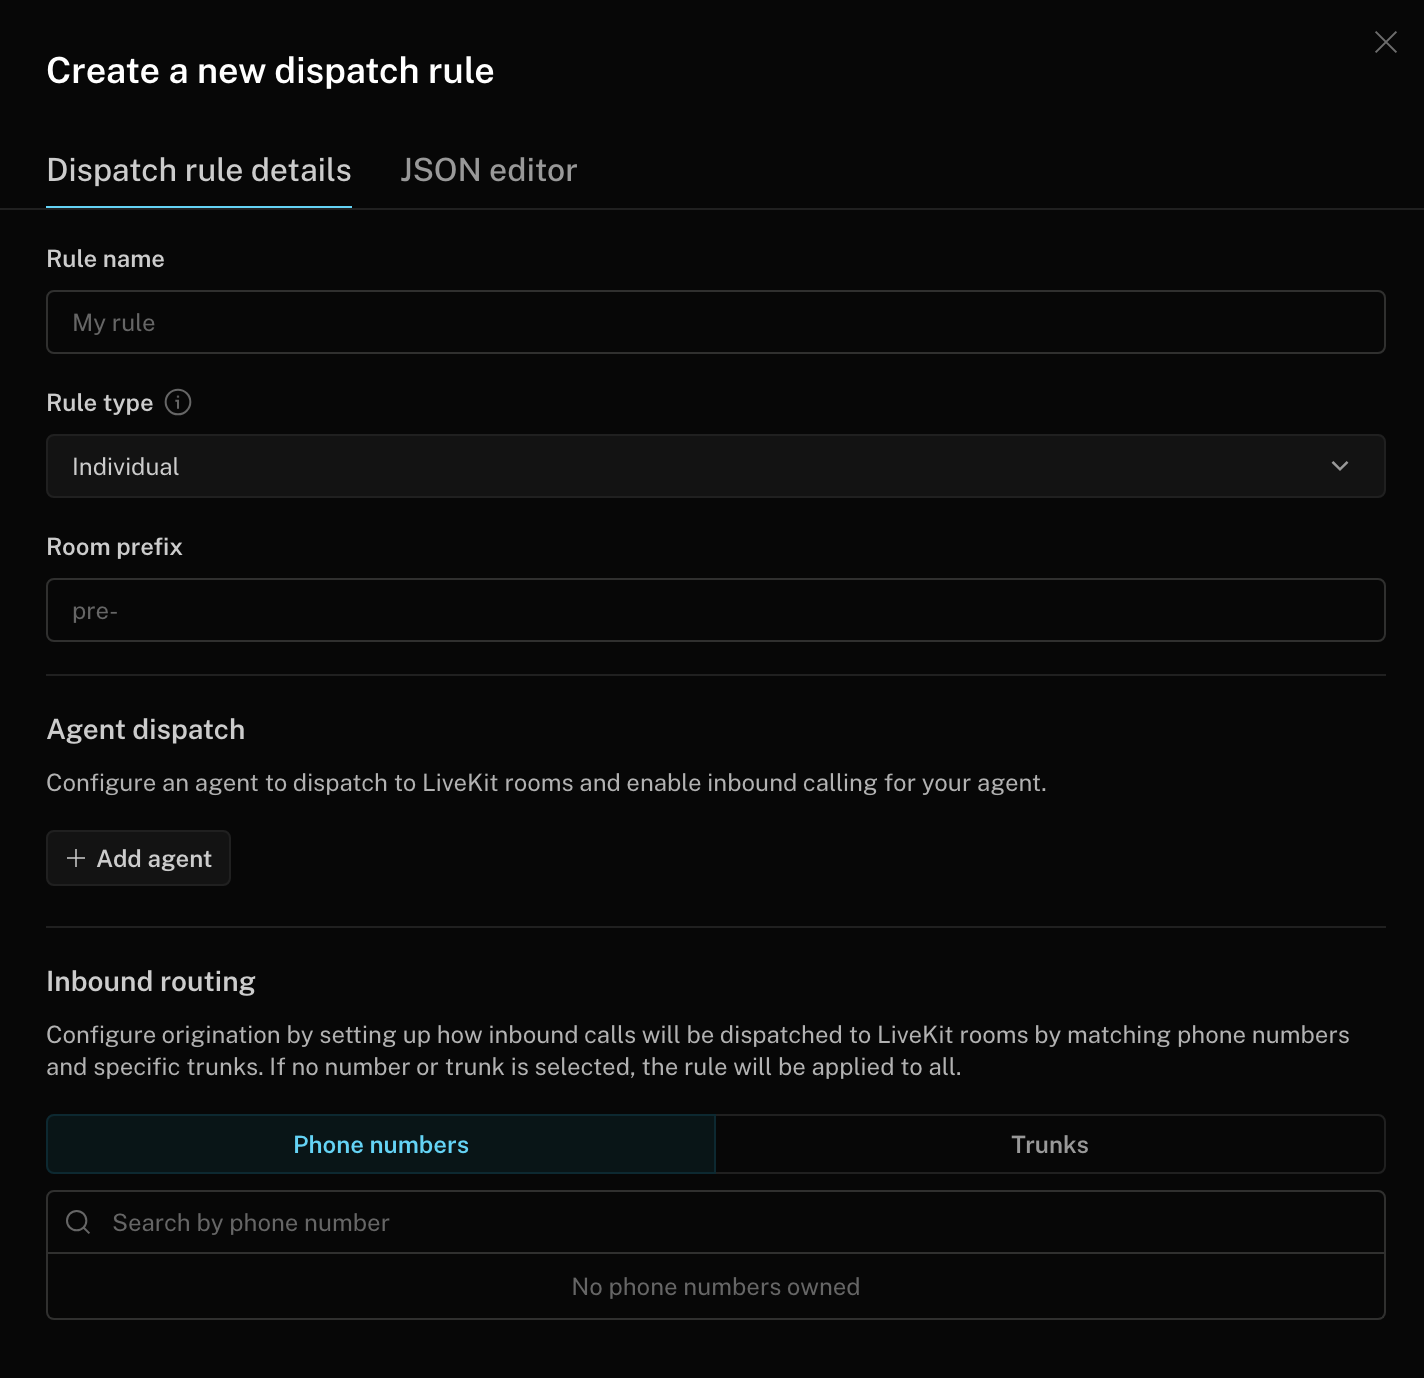
Figure 4: Dispatch rule creation. Without at least one dispatch rule, LiveKit accepts the INVITE but drops the call because no room is assigned.
Dispatch rule via JSON
{
  "name": "FlyNumber dispatch",
  "rule": {
    "dispatchRuleIndividual": {
      "roomPrefix": "call-"
    }
  }
}
Step 4 — Point FlyNumber at LiveKit
In your FlyNumber SIP forwarding settings, configure the fields as follows:
| Field | Value |
|---|---|
| Host | {project}.sip.livekit.cloud (the SIP URI from your Project settings, without the sip: prefix) |
| Username | Your FlyNumber in E.164 format (e.g., +17185301799) |
LiveKit accepts UDP on port 5060 by default, so no transport change is needed to start receiving calls. If you've turned on secure trunking on the LiveKit side, switch the Transport toggle to TLS in your FlyNumber settings.
Step 5 — Attach an agent
Even with the trunk and dispatch rule published, a call that lands in a LiveKit room with no agent subscribed will just sit in silence. Make sure an agent (your own, or one deployed via LiveKit Agents) is configured to pick up rooms created by your dispatch rule before you test.
LiveKit's inbound trunk matches incoming calls against the To: user in the SIP INVITE. If the username field holds a friendly name — something like agent1 or john instead of +17185301799 — LiveKit replies with 404 Not Found and your FlyNumber call log shows status fail, reason not found. No connection attempt appears on the LiveKit side either, because the trunk rejects the INVITE before any dispatch rule runs.
The inbound trunk decides whether to accept a given DID. The dispatch rule decides which room the call goes into. A valid trunk with no dispatch rule will still fail the call, so publish both before testing.
LiveKit only enforces IP-level restrictions when allowedAddresses is set on the inbound trunk. If you've added that restriction, add our server IP (138.197.42.26) there — otherwise LiveKit will accept traffic from any source that presents the right DID.
PBX Systems
- Asterisk: Configure extensions and SIP trunks
- FreePBX: Set up inbound routes and trunks
- 3CX: Create SIP trunk with FlyNumber credentials
- FreeSWITCH: Set up SIP profiles and dialplans
VoIP Providers
- Twilio: Forward to SIP domains
- Callcentric: Use SIP URI forwarding
- Telnyx: Configure SIP trunking
- Flowroute: Set up inbound routes
- OnSIP: Use inbound bridge configuration
Set "host" to iptel.org and "user/extension" to music to quickly test your FlyNumber. You'll hear music when you call the number.
Troubleshooting
Check your call logs when calls aren't behaving — most issues show up there with a recognizable status.
Common symptoms
| What you see | Likely cause | What to try |
|---|---|---|
| Calls fail almost immediately, no ring | You entered a hosted SIP service's domain with a non-standard Port. Hosted services route by DNS and need Port blank (or a standard 5060/5061). | Clear the Port field. FlyNumber will discover the right server automatically. |
| Calls hang for ~30 seconds then drop | Your Host is the underlying proxy hostname instead of the service's main domain. The service silently drops calls whose address doesn't match. | Use the service's main domain (the part after @ in your SIP address), and leave Port blank. |
| Calls work intermittently | DNS resolution failures on the Host you've entered — the SRV record is sometimes returning no result, or the destination's nameserver is flaky. | Confirm the Host is a valid public hostname; dig <host> (or dig SRV _sip._tls.<host> for TLS) from any server tells you what DNS is returning. |
| Call connects briefly then drops after a few seconds (TLS) | Your client is set to use ZRTP encryption, which FlyNumber doesn't support. | In your softphone or server settings, disable ZRTP and enable SRTP / SDES instead. |
488 Not Acceptable Here (TLS on) | Your SIP server doesn't support SRTP, which is required for TLS forwarding. | Either enable SRTP / SDES on your server, or switch Transport back to UDP. |
| TLS handshake fails | Your server's certificate has a problem (expired, mismatched, or otherwise rejected during the TLS handshake). | Click Contact in the panel sidebar — TLS handshake issues need server-side investigation. |
Time Out | No response from your SIP server within ~32 seconds. | Verify your server is running and reachable from the public internet. Allow FlyNumber's server IP. |
Proxy Authentication Error | Your server is challenging FlyNumber for SIP credentials, which we don't send by default. | If your server requires authenticated SIP, see Need authenticated SIP?. |
Forbidden | Your server explicitly rejected the call — usually a wrong Username, a server-side ACL block, or required registration. | Double-check the Username field and your server's accept rules. |
Best practices
- Allow our server IP (
138.197.42.26) in your SIP server's ACL (Asterisk, FreePBX, etc.) — see IP Addresses above. - Make a test call after every config change. Don't rely on the form saving as proof things work.
- Match codecs. We send G.711 (A-law and µ-law) first; if your server only supports something exotic, you'll get a codec mismatch.
- Use TLS deliberately, not by default. TLS requires SRTP support on your end. UDP is fine for most setups; pick TLS when you actually need the encryption.
- Monitor call logs when rolling out a change — the status field tells you exactly what happened.
If you're using Asterisk, FreePBX, or any server that filters inbound IPs, allow our server IP in your ACL before testing.
What's Next?
After configuring VoIP forwarding:
- Make a test call to your FlyNumber
- Check your call logs for successful connection
- Verify audio quality and connection stability
- Configure any additional features in your VoIP system
For advanced call handling features like auto-attendants, time-based routing, or call recording, consider using our cloud phone system.