Message Destinations
A message your agent takes normally comes to you: by email to your account's address, in the panel's notification bell, and on the agent's Messages tab. A message destination sends it to the person or system it's meant for:
- An email address, such as a colleague's inbox or the front desk.
- A webhook in Zapier, Make or n8n, which can pass the message on to Slack, WhatsApp, a spreadsheet, a calendar or a CRM.
It takes two steps: add the destination in the Message destinations card on the agent's Connections tab, then pick it under Send to on a Take a message rule. A rule left on Account email works exactly as before.
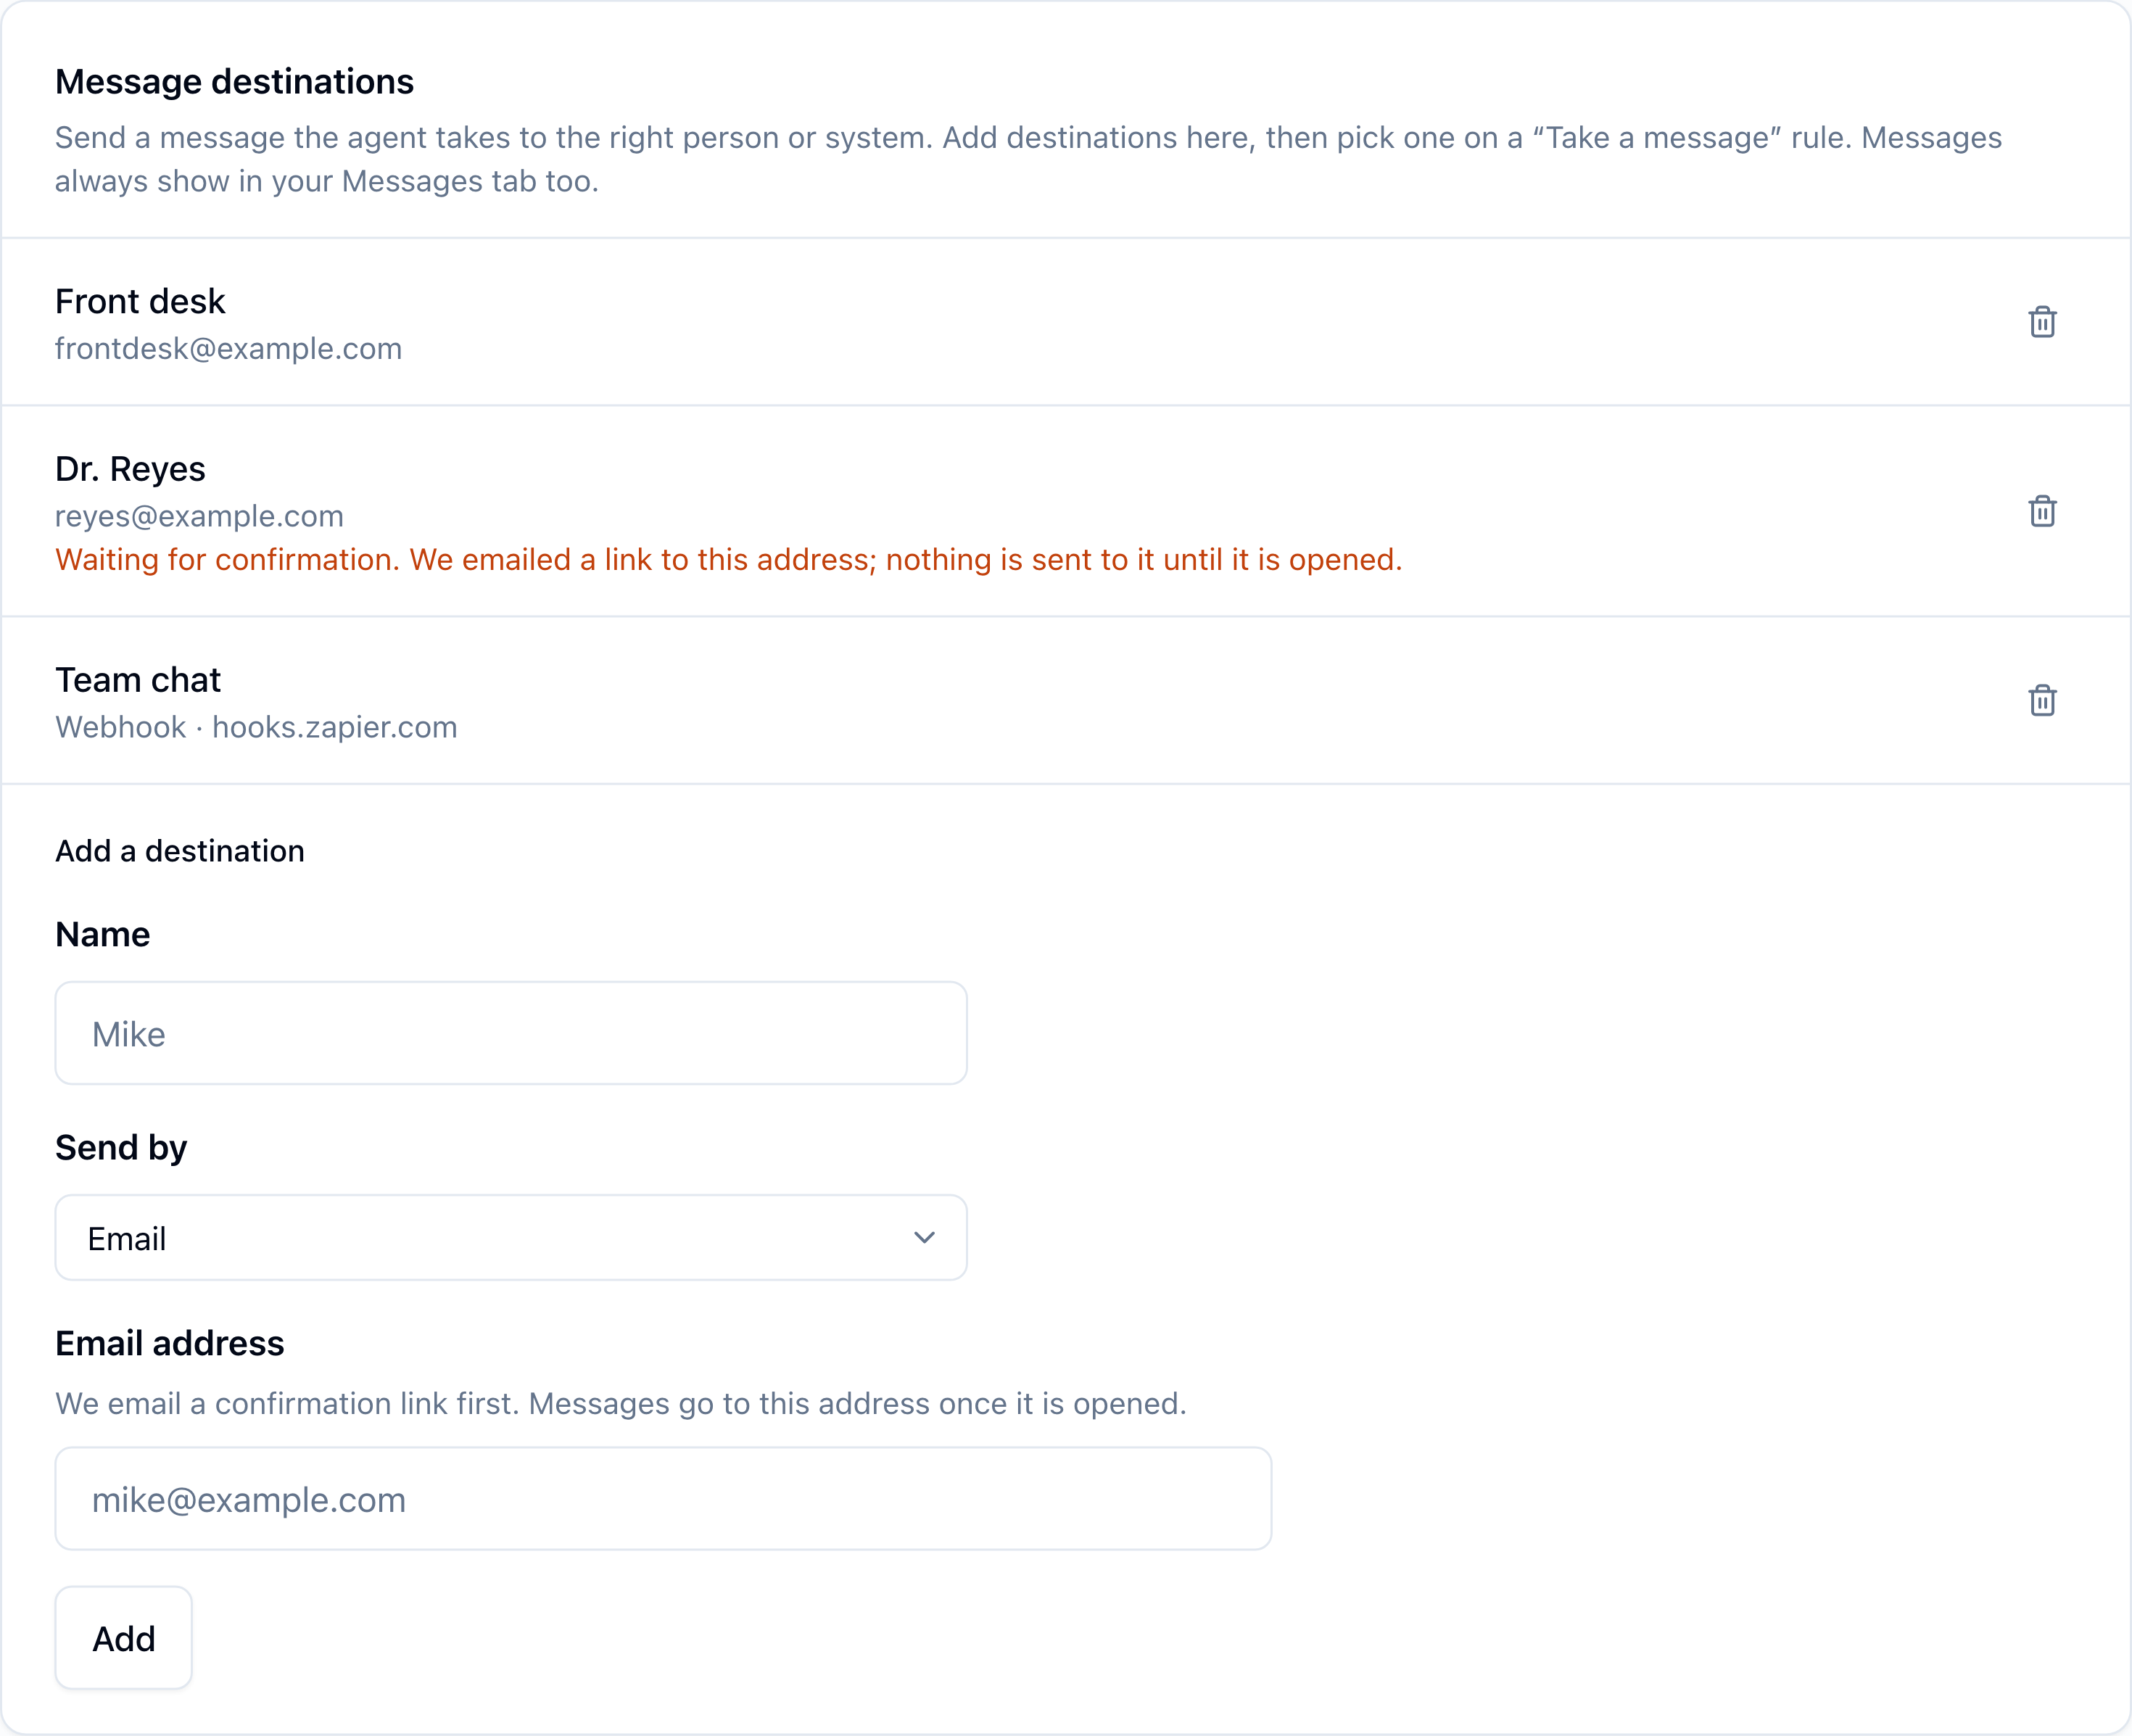
Destinations belong to your account, so all your agents can use them. An account can have up to 20.
Who gets what
| The rule's Send to | Webhook | Panel notification and Messages tab | |
|---|---|---|---|
| Account email (the default) | Your account's email address | – | Yes |
| An email destination | The destination's address, instead of your account's | – | Yes |
| A webhook destination | Your account's email address, as usual | The message is posted to the webhook | Yes |
- You keep your own copy. Wherever a message is sent, it still lands on the agent's Messages tab and you still get the panel notification.
- Your notification settings cover your notifications only. The Email and Panel toggles for AI voice agents in Notification Settings decide what you receive. An email destination gets its email even when your Email toggle is off.
- One message per call. If the agent takes a second message during the same call, it replaces the first.
Send messages to an email address
- Open your agent and go to the Connections tab.
- In Message destinations, under Add a destination, type a Name (up to 60 characters). This is how the destination appears in the Send to menu, so the person's name or role works well.
- Leave Send by on Email and type the Email address.
- Click Add.
FlyNumber emails a confirmation link to that address. Until someone opens it, the destination shows Waiting for confirmation. We emailed a link to this address; nothing is sent to it until it is opened. It isn't offered in the Send to menu, and no message goes to it.
- The link works for 72 hours. If it expired or went missing, add the same address again. That sends a new link and doesn't create a duplicate.
- The confirmation email shows your account's email address, so the recipient can see who is asking. Its subject is Confirm this address for AI voice agent messages.
- Your account's own email address needs no confirmation. It's ready as soon as you add it.
- The recipient doesn't need a FlyNumber account. Each message arrives as an email titled New message for '[agent name]', with who it's from, the number they left, the reason, their caller ID, and the FlyNumber they called.
Send messages to a webhook
A webhook is a web address that an automation service gives you. FlyNumber posts each message to it, and your automation decides what happens next: post it in a Slack channel, send a WhatsApp message, add a spreadsheet row, create a task in your CRM. None of those apps is built into FlyNumber; the automation service is the bridge to them.
FlyNumber accepts webhook addresses from three services. The address must start with https://.
| Service | The address looks like |
|---|---|
| Zapier | https://hooks.zapier.com/hooks/catch/… |
| Make | https://hook.eu1.make.com/… (yours may show us1, eu2 or another zone in place of eu1) |
| n8n Cloud | https://your-workspace.app.n8n.cloud/webhook/… |
Other addresses aren't accepted, including self-hosted n8n and your own server.
To add one:
- Create the webhook in your automation service and copy its address. The walkthroughs below cover Zapier, Make and n8n.
- In Message destinations, type a Name, set Send by to Webhook (Zapier, Make or n8n), and paste the address into Webhook address.
- Click Add. FlyNumber sends a test message to the address right away.
If the service accepts the test, the destination is saved and ready to pick on a rule. If it doesn't, you'll see We couldn't deliver a test message to that address. Check it and try again. and nothing is saved.
Anyone who has a webhook address can post to your automation. Once it's added, FlyNumber doesn't show the address again: the card lists only the service, for example Webhook · hooks.zapier.com. Give each destination a name that tells you which automation it feeds.
Pick the destination on a rule
- On the Rules tab, find a rule whose action is Take a message. A Send to menu appears beside it once your account has at least one destination that's ready: a webhook, or an email address that has been confirmed.
- Choose the destination, or leave Account email.
- Click Save, then Publish. Callers get the new routing once that version is live.

To route messages to different people, give each of them a rule:
| When… | Then | Send to |
|---|---|---|
| The caller asks for Dr. Reyes or is calling about a surgery follow-up | Take a message | Dr. Reyes |
| The caller asks about a prescription refill or a test result | Take a message | Front desk |
| The caller wants to leave a message about anything else | Take a message | Account email |
The agent sends the message to the destination on the rule that matched. It goes by the rule's When… text, not by the destination's name, so put the person or the topic in that text. A message that doesn't match a rule with a destination goes to your account email.
Zapier
Webhooks by Zapier is included in Zapier's Professional plan and higher. It isn't part of the Free plan. New Zapier accounts start with a 14-day trial of Professional. See Zapier's pricing.
- In Zapier, create a Zap and click its Trigger step. Search for and select Webhooks by Zapier.
- In the Event menu, choose Catch Hook, then click Continue. Leave the optional child-key field empty and click Continue again.
- On the Test tab, Zapier shows your webhook URL. Click Copy.
- In FlyNumber, add a webhook destination with that address. FlyNumber sends its test message.
- Back in Zapier, click Test trigger. The test message appears with its fields. Do this soon after step 4; Zapier only shows requests from the past hour.
- Add an action, such as a Slack channel message or a new Google Sheets row, and insert the fields you want, for example
message_name,message_phoneandmessage_details. - Publish the Zap. Messages reach your action only while the Zap is on.
Each message runs the Zap once and counts toward your Zapier plan's tasks. Zapier's own guide is Trigger Zaps from webhooks.
Make
- In Make, create a scenario and add Webhooks > Custom webhook as its first module.
- Next to the Webhook dropdown, click Add, give the webhook a name and click Save. Make shows the webhook's address and starts listening for a first request. Copy the address.
- In FlyNumber, add a webhook destination with that address. Make reads the message's fields from FlyNumber's test message.
- Add the next module, such as a Slack message or a Google Sheets row, and map the fields you want.
- Save the scenario and switch it on. Keep its schedule on Immediately as data arrives, so each message is passed on as it comes in.
A few things to know about Make:
- Leave the webhook's API key authentication off. FlyNumber can't send a key.
- While the scenario is off, Make still accepts messages but holds them in a queue instead of running.
- Make deactivates a webhook that hasn't been connected to a scenario for more than 5 days. After that it rejects messages.
Make's own guide is Webhooks.
n8n Cloud
- In your workflow, add a Webhook node as the trigger. Set HTTP Method to POST, Authentication to None, and Respond to Immediately.
- Publish the workflow, then copy the node's Production URL.
- In FlyNumber, add a webhook destination with that address.
Use the Production URL, not the Test URL. The Test URL only listens for a couple of minutes while you're testing in the n8n editor, so a destination added with it stops receiving messages. Only n8n Cloud addresses (ending in .app.n8n.cloud) are accepted. See n8n's Webhook node docs.
What your webhook receives
Each message is an HTTP POST with a JSON body (Content-Type: application/json, User-Agent: FlyNumber-AI-Voice-Agents/1). Every field sits at the top level, so automation tools list them directly.
{
  "event": "message.taken",
  "id": "5d0f6a3e-91c7-4f0b-a2de-7c1b9e4f8a25",
  "test": false,
  "agent_id": "c2a8e6b1-3f47-4d9a-8b10-6e5d2f9a7c34",
  "agent_name": "Harbor Lane Veterinary",
  "destination_name": "Front desk",
  "message_name": "Priya Nair",
  "message_phone": "207 555 0143",
  "message_details": "Needs a refill of Biscuit's joint medication before Friday.",
  "caller_number": "+12075550143",
  "called_number": "+12075550182",
  "taken_at": "2026-11-12T15:42:08.512+00:00"
}
| Field | What it holds |
|---|---|
event | Always message.taken |
id | The call's id. It's the same every time the same message is delivered, so use it to spot duplicates |
test | true for the test message sent when you add the webhook, false for a real message |
agent_id | The agent's id, the same one that appears in the agent's address in the panel |
agent_name | The agent's name |
destination_name | The name you gave this destination |
message_name | The caller's name as they gave it. Can be empty |
message_phone | The phone number the caller gave, as the agent noted it. Can be empty |
message_details | The reason for the call. Can be empty |
caller_number | The caller ID, as + followed by digits. null when the caller hid their number |
called_number | The FlyNumber they called, as + followed by digits |
taken_at | When the AI conversation ended, as an ISO 8601 timestamp in UTC |
The test message
When you add a webhook, FlyNumber posts one sample so your automation has fields to map. It has "test": true, the word test as its id and agent_id, and made-up caller details (Test Caller, +12125550100). Adding the same address again sends another one.
If you don't want test messages to reach your team, add a filter step to your automation that continues only when test is false.
Delivery
- When. Shortly after the call ends, usually within a few minutes.
- What counts as delivered. Any
2xxreply within 4 seconds. Redirects aren't followed. Your automation should reply straight away and do its work afterwards; Zapier and Make do this by default. - Retries. If a delivery fails, FlyNumber tries again every few minutes until 30 minutes after the call ended, then stops. The message is still on the agent's Messages tab, and you still get your own notification.
- Duplicates. A message can arrive more than once, for example when your service received it but its reply got lost. Every delivery of the same message carries the same
id, so an automation that mustn't act twice should skip anidit has already handled. - No signature. Requests carry no secret or signature. The address itself is the secret.
Change or remove a destination
- A new address. Destinations can't be edited. Add the new one, switch your rules to it, save and publish, then remove the old one.
- Remove. Click the bin icon next to the destination. If an agent still sends messages to it, you'll see An agent still sends messages to this destination. Change that rule and save, then try again. That covers an agent's live version, its latest saved version, and a version waiting to go live. Switch the rule to Account email or another destination, Save and Publish, then remove it.
- The limit. 20 destinations per account, including any still waiting for confirmation. At the limit, the form is replaced by You can have up to 20 message destinations. Remove one to add another.
Troubleshooting
| What you see | What to check |
|---|---|
| "Paste the webhook address from Zapier, Make or n8n. It starts with https://" | The address must be a complete https:// webhook address from Zapier, Make or n8n Cloud, including everything after the host name. Self-hosted n8n, other services and your own server aren't accepted. |
| "We couldn't deliver a test message to that address. Check it and try again." | The service didn't accept the test within 5 seconds. n8n: the workflow is published, the node uses POST with Authentication set to None, and you copied the Production URL. Make: the webhook still exists, is switched on and doesn't require an API key. Zapier: copy the URL again from the trigger's Test tab. |
| A destination stays on Waiting for confirmation | Nobody has opened the link yet. Ask the recipient to check their spam folder, or add the same address again to send a new link. |
| The recipient sees "This confirmation link has expired. Ask for a new one." | The link is older than 72 hours. Add the same address again. |
| "We couldn't send the confirmation email. Add the address again to retry." | The confirmation email didn't go out. Check the address for typos and add it again. |
| Adding keeps failing after several tries | You can try up to 10 times an hour. Wait a while, then add it again. |
| A rule has no Send to menu | The rule's action must be Take a message, and you need at least one destination that's ready. An email destination that's waiting for confirmation isn't listed. |
| Send to shows Unavailable destination | The destination was removed. Pick another one, or Account email, then save. |
| "A transfer target, the live-data connection or a message destination is no longer available. Remove it and save again." | Something the agent uses has been removed since you opened the page. If it's a destination, choose again under Send to on that rule, then save. |
| The message went to your account email, not the destination | Check that you published after picking the destination (the live version decides), and that the rule's When… text matches how callers bring the subject up. A message taken under a different rule follows that rule's Send to. |
| The message is on the Messages tab but never reached your automation | The Zap is off, the Make scenario is off, or the n8n workflow isn't published; or the webhook was deleted on that side. FlyNumber retries for 30 minutes and doesn't send the message again after that. Check the run history in your automation service. |
| The same message arrived twice | That can happen. See Delivery and skip an id you've already handled. |
Privacy
A message holds what the caller told the agent (their name, phone number and reason for calling) plus their caller ID. An email destination receives that by email. A webhook sends it to the automation service you chose, which handles it under its own terms, as does any app it passes the message on to.
Deleting a message in the panel, or the 90-day clean-up of call details, doesn't recall anything already sent to a destination.