Contact Methods

The Contact Methods section is where you manage all the ways calls can be handled in your phone system. This includes:

  • App configurations for the phone system app
  • SIP accounts for VoIP phones and softphones
  • PSTN routing for forwarding to regular phone numbers
  • External SIP URIs for routing to other VoIP systems
  • Email addresses for receiving voicemails and call recordings
tip

Keep in mind once a contact method is configured it can be setup to work without using the panel and/or modules. To setup the App as a contact method you'll need to do this from the user menu.

Common Settings​

Inbound Calls Configuration​

All contact methods (except email) share these common inbound call settings:

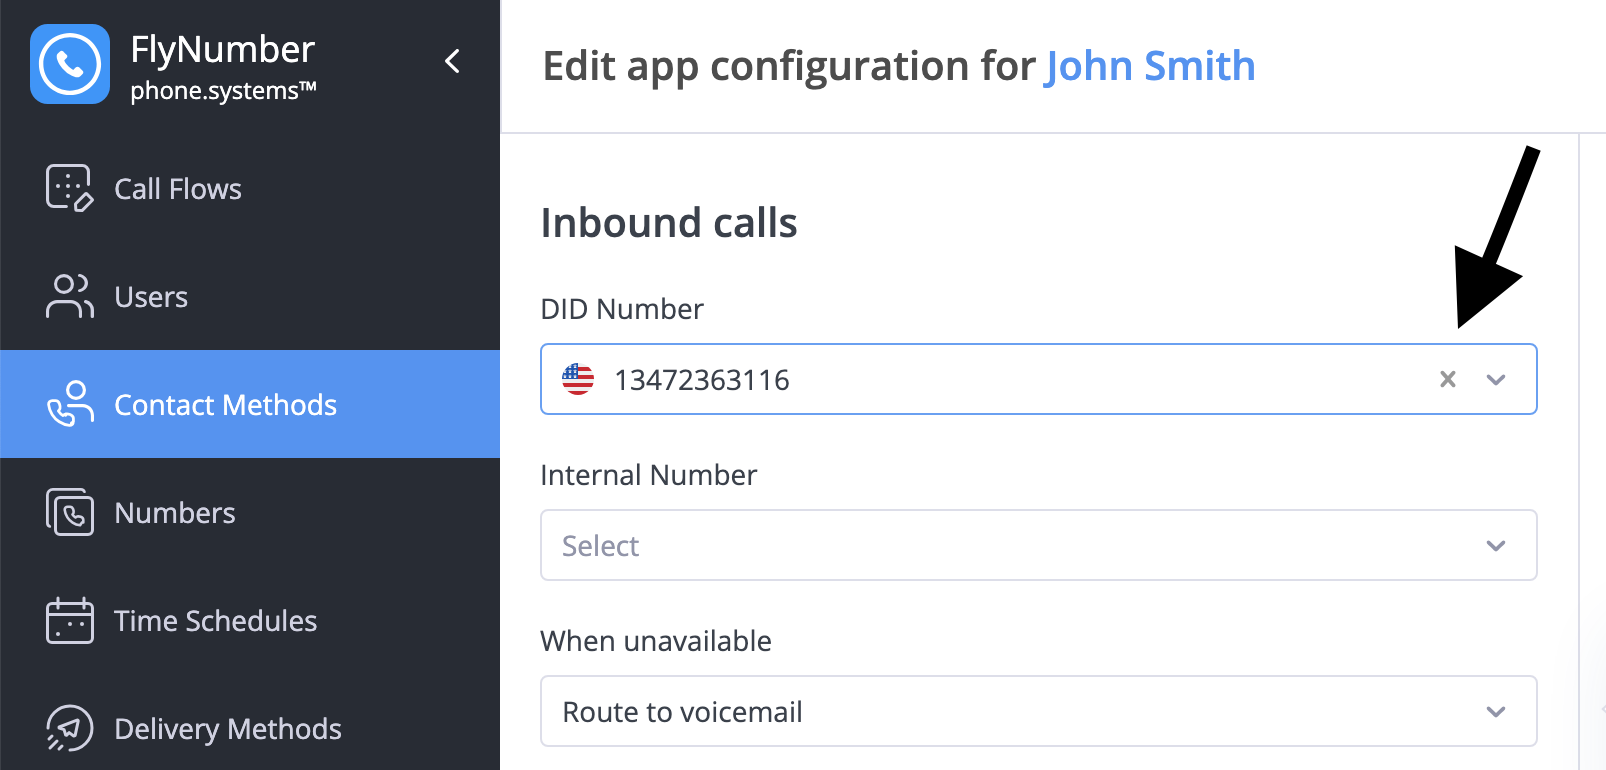
  • DID Number: Select which FlyNumber rings to this contact method

    warning

    If you set a DID number here, you can't use it in a phone number module for call flows. Leave this empty if you want to use the number in a more complex call flow.

  • Internal Number: Set an extension for internal calling

    • 1-4 digit number
    • Must be unique across your system
    • Used for quick internal dialing
  • When unavailable: Choose what happens when calls can't be answered

    • Do Nothing: End the call
    • Route to Voicemail: Send to voicemail with selected greeting
    • Custom handling options may vary by contact method type
  • Voicemail audio: Select greeting for voicemail (if enabled)

    • Choose from your uploaded audio files
    • Different greetings for different scenarios
    • Professional message recommendations

Integration with Call Flows​

All contact methods (App configurations, SIP accounts, PSTN routes, and SIP forwarding) can be integrated into your call flows using the Ring Group module. This allows you to:

  • Create complex routing scenarios
  • Combine with other call handling features
  • Set up conditional routing
tip

To use a contact method in a call flow:

  1. Clear the DID number from the contact method's inbound settings
  2. Use a Phone Number module connected to a Ring Group
  3. Add the contact method as a destination in the Ring Group

You can enhance your call flow by adding other modules like:

Call Transfers​

Call transfer functionality allows callers to transfer calls to other numbers using feature codes. This applies to both SIP Accounts and PSTN Routes (regular phone number forwarding). When "Allow Call Transfer" is enabled in the contact method settings, callers can perform call transfers during a call.

To configure call transfers, you need to:

  1. Enable Allow Call Transfer in the settings of your SIP Account or PSTN Route
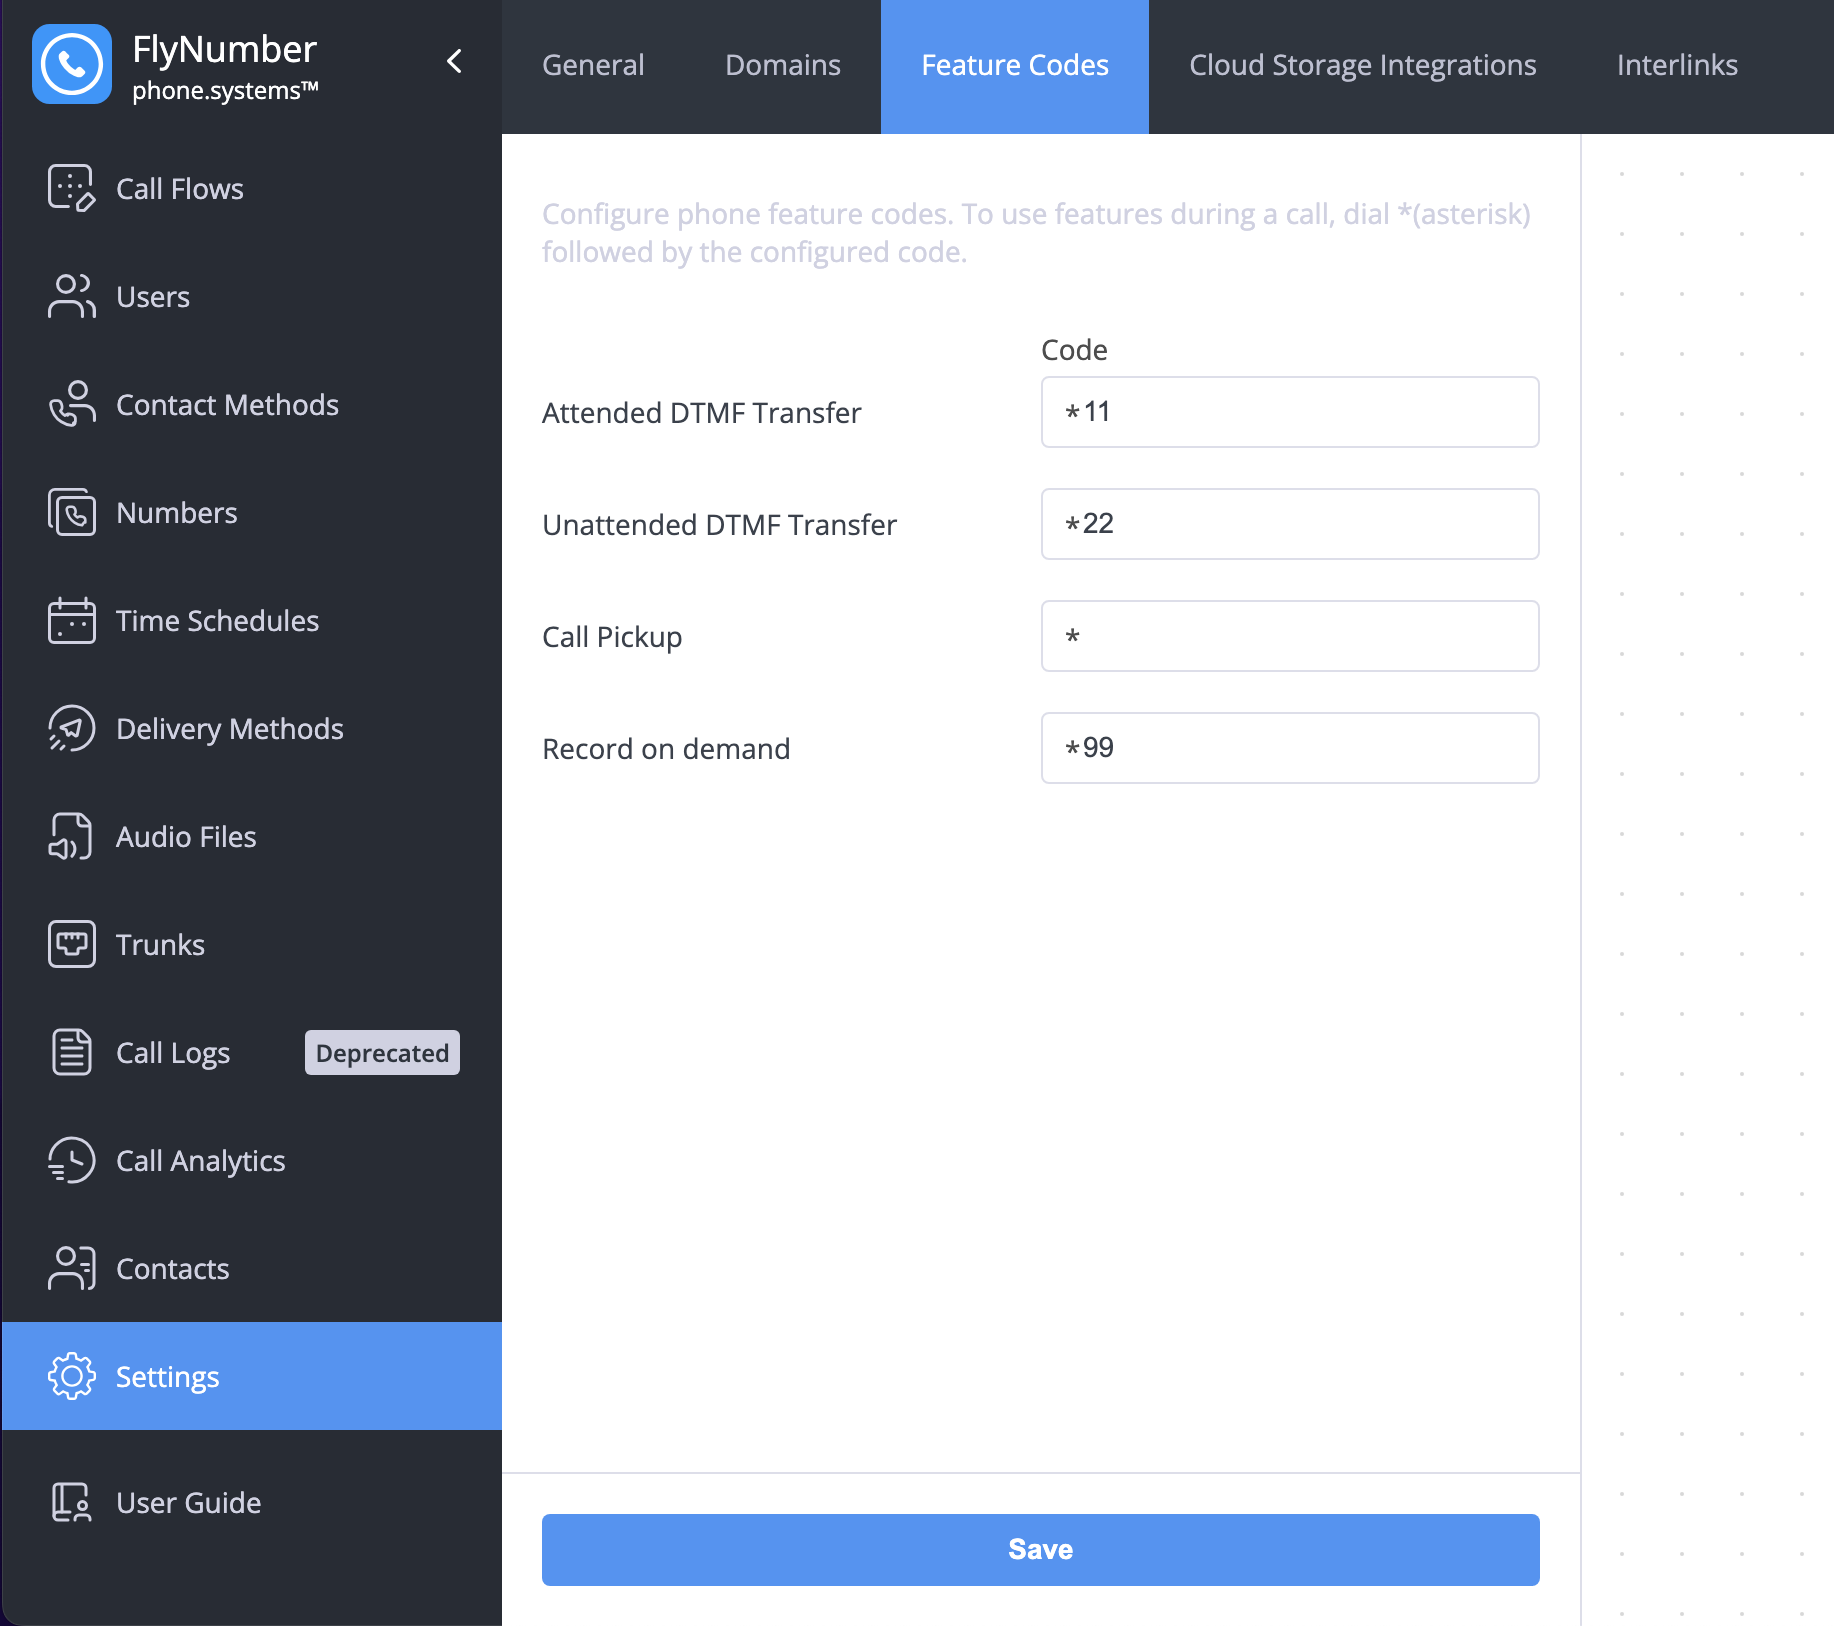
  2. Ensure the appropriate feature codes are set up in Settings β†’ Feature Codes

Feature codes configuration for call transfers

There are two types of transfers available, here's how it could work:

1. Attended Transfer​

  • Press *11 during the call (using our example)
  • Enter the destination number in E.164 format (without +) followed by #
  • The system announces "Transfer"
  • Speak with the new recipient first
  • Complete the transfer after confirmation
  • Return to the original caller if needed
Use Case

Perfect for when you need to:

  • Confirm recipient availability
  • Provide context before transfer
  • Ensure a proper handoff

2. Unattended Transfer​

  • Press *22 during the call (using our example)
  • Enter the destination number in E.164 format (without +) followed by #
  • The system announces "Transfer"
  • The call transfers immediately
  • The original caller connects directly to the destination
Use Case

Ideal for:

  • Quick transfers
  • Known recipients
  • Routine call routing
warning

Enabling call transfers may incur additional per-minute charges for the transferred calls.

App Configurations πŸ“±β€‹

The App Configurations tab shows all users who have the phone system app configured. Here you can manage app settings like inbound/outbound calling options and recording preferences. Once configured, these app configurations can be used as destinations in your call flow with-in the ring group module.

Important

Unlike other contact methods which can be added directly in the Contact Methods menu, app configurations must be set up through the Users menu. See App Integration in Users for details.

There are two ways to set up app configurations:

  1. For New Users:

    • Create a new user in the Users menu
    • Enable "Configure application line in the next step"
    • Complete the app configuration setup
    • User will receive an email with activation instructions
  2. For Existing Users:

    • Ensure the user has an email address
    • Go to the Users menu
    • Use "Send invite to app" from the Actions menu
    • See Sending App Invitations for step-by-step instructions

App Configurations tab showing list of app users and their settings

The interface displays key information for each app user:

FieldDescription
UserName of the app user
NumberAssigned FlyNumber for inbound calls
Internal numberExtension for internal calling
When unavailableAction taken when user can't answer
Enable external outbound callsWhether external calling is allowed
Caller ID(s)Numbers used for outbound calls
Caller ID nameDisplay name for outbound calls
Internal caller IDIdentity for internal calls
Inbound internalCall recording setting for internal incoming calls
Delivery MethodWhere call recordings are sent
Inbound externalCall recording setting for external incoming calls
Outbound internalCall recording setting for internal outgoing calls
Outbound externalCall recording setting for external outgoing calls
On demandWhether manual call recording is enabled
Customizing the View

You can drag columns left or right to rearrange them in any order you prefer. This helps you focus on the most important information for your needs.

Exporting Data

Click the download icon in the top right corner to export all app configurations to a CSV file. This can be useful for backup purposes or bulk review of settings.

Managing App Settings​

To modify an app user's settings:

  1. Click the Actions menu (three dots) for the user
  2. Select "Edit"
  3. Adjust the configuration options:

Edit app configuration showing inbound and outbound call settings

Call Settings​

Outbound Calls

  • Enable external outbound calls: Toggle ability to make external calls
  • Caller IDs: Choose which numbers to use for outbound calls
  • Caller ID name: Set the display name for outbound calls
  • Internal Caller ID: Set identity for internal calls
  • Announcements: Configure audio for internal/external calls

Call Recording​

Call recording settings for app configuration

Configure recording settings:

  • Delivery Method: Where recordings are sent (Email, Dropbox, FTP, SFTP, Google Drive, OneDrive, or Cloud Storage)
  • Call Types to Record:
    • Inbound Internal
    • Inbound External
    • Outbound Internal
    • Outbound External
  • Record on Demand: Enable manual recording during calls
note

Call recordings are:

  • Sent immediately after each call ends
  • Not stored on phone system servers
  • Subject to email server file size limits (approximately 7MB per hour)
Cloud Storage Integration

In addition to the standard delivery methods, you can optionally configure cloud storage integration (AWS, Azure, or MinIO) through Settings β†’ Cloud Storage Integrations. This provides an alternative way to store and manage your recordings.

note

To remove an app device, you'll need to do this from the Users section under App Devices.

SIP Accounts πŸŒβ€‹

SIP accounts provide an alternative way to use your phone system with any SIP-compatible client. Instead of using the phone system app, you can configure your preferred SIP client (like Zoiper or Groundwire) using credentials provided by the system. Once configured, these SIP accounts can be used as destinations in your call flow with-in the ring group module.

Quick Start

For simple use cases, you can set up a SIP account here for inbound and outbound calls without needing to set up call flow logic. Just configure the account settings and start using it with your SIP client right away. For more complex scenarios, you can integrate the SIP account into your call flows using ring groups.

SIP Accounts interface showing list of configured accounts

The SIP Accounts interface displays:

FieldDescription
IDUnique identifier for the SIP account
UserName of the user assigned to this account
NumberFlyNumber assigned for inbound calls
Internal numberExtension for internal calling
When unavailableAction taken when user can't answer
Allow Call TransferIndicates if call transfer is enabled
Enable external outbound callsWhether external calling is allowed
Caller IDNumber used for outbound calls
Caller ID nameDisplay name for outbound calls
Internal caller IDIdentity for internal calls
Delivery MethodWhere call recordings are sent
Inbound internalCall recording setting for internal incoming calls
Inbound externalCall recording setting for external incoming calls
Outbound internalCall recording setting for internal outgoing calls
Outbound externalCall recording setting for external outgoing calls
Record on demandWhether manual call recording is enabled
tip

You can drag columns left or right to rearrange them in any order you prefer. You can also download your SIP account configurations by clicking the download icon in the top right corner.

Creating a SIP Account​

To create a new SIP account:

  1. Click the + button in the bottom right corner
  2. Configure the following sections:

General Settings​

Selecting a user for SIP account

Select the user who will own this SIP account. The user's settings and permissions will apply to this account.

Call Settings​

Outbound Calls

Outbound call settings for SIP account

Set up outgoing call options:

  • Enable external outbound calls: Toggle ability to make external calls
  • Caller ID: Choose which number to use for outbound calls
  • Internal Caller ID: Set identity for internal calls
  • Announcements: Configure audio for internal/external calls

Call Recording​

Call recording settings for SIP account

Configure recording settings:

  • Delivery Method: Where recordings are sent
  • Call Types to Record:
    • Inbound Internal
    • Inbound External
    • Outbound Internal
    • Outbound External
  • Record on Demand: Enable manual recording during calls
note

Call recordings are:

  • Sent immediately after each call ends
  • Not stored on phone system servers
  • Subject to email server file size limits (approximately 7MB per hour)
Cloud Storage Integration

In addition to the standard delivery methods, you can optionally configure cloud storage integration (AWS, Azure, or MinIO) through Settings β†’ Cloud Storage Integrations. This provides an alternative way to store and manage your recordings.

Advanced Settings​

Advanced settings for SIP account

Configure technical settings:

Allowed IPs

Allowed IPs configuration

  • Enable to restrict registration to specific IP addresses
  • Support for both IPv4 and IPv6
  • CIDR notation allowed for IP ranges

Codecs

  • OPUS
  • G722
  • PCMU
  • PCMA
  • G729
  • GSM
  • telephone-event (required for interactive menus and feature codes)

Media Types

  • RTP (default)
  • SRTP-SDES
  • SRTP-DTLS

Transport Protocol

  • TCP
  • UDP
  • TLS
  • WSS
warning

Encrypted media types (SRTP) and transport protocols (TLS) are disabled by default. Contact support to enable these features.

SIP Credentials​

After saving, click the edit button (three dots on the right) to view the SIP credentials needed for your client:

SIP credentials view

tip

If you added this SIP account to a ring group, you can click the gear icon of the ring group module, then the edit icon on the SIP account destination to also view the SIP credentials.

PSTN Routes (phone number forwarding) πŸ“žβ€‹

PSTN Routes allow you to forward calls from your FlyNumber to any regular phone number. Once you setup a route, you can then use the "contact method" anywhere in your call flow with-in the ring group module.

For simple forwarding needs, you can configure everything right here without creating complex call flows on the panel itself. Just select your FlyNumber and enter the destination phone number to get started.

note

There is a phone system specific per-minute rate when forwarding calls to regular phone numbers.

PSTN Routes interface showing list of forwarding rules

The PSTN Routes interface displays:

FieldDescription
Destination NumberThe phone number receiving forwarded calls
UserName of the user this route is assigned to
NumberFlyNumber used for inbound calls
Internal numberExtension for internal calling
When unavailableAction taken when destination is unreachable
Allow Call TransferIndicates if call transfer is enabled
tip

You can drag columns left or right to rearrange them in any order you prefer. You can also download your PSTN routes configuration by clicking the download icon in the top right corner.

Creating a PSTN Route​

To create a new PSTN route:

  1. Click the + button in the bottom right corner
  2. Configure the following settings:

General Settings​

Basic settings for PSTN route

Configure the basic settings:

  • User: Select the user who will own this route
  • Phone number: Enter the destination number in E.164 format:
    • No + symbol, 011, or 00 prefix
    • Include country code and full number
    • Examples:
      • UK: 44405551212
      • USA: 12125551212
  • Allow Call Transfer: Enable to allow callers to transfer calls
    warning

    Enabling call transfers may incur additional per-minute charges for the transferred calls.

SIP Forwarding β†ͺ️​

The SIP Forwarding tab allows you to set your FlyNumber to ring directly to an external SIP address or URI. This can be an external VoIP provider or your own VoIP solution (Asterisk, FreeSwitch, 3CX, etc.). Once configured, these SIP forwarding rules can be used as destinations in your call flow with-in the ring group module.

SIP Forwarding general settings

General Settings​

Configure the connection details for your SIP system:

  • User: Select the user who will own this configuration
  • Username: Your SIP username
  • Domain: The SIP domain or IP address
  • Port: The port number for SIP communication
  • Network Protocol: Choose from:
    • IPv4 Only
    • IPv6 Only
    • Dualstack
    • IPv4 Preferred
    • IPv6 Preferred
  • Process 30X redirects: Enable/disable SIP redirect handling
Compatible Systems

You can use SIP forwarding with various SIP-enabled systems and software including:

  • Asterisk
  • FreePBX
  • FreeSwitch
  • 3CX
  • Any SIP-compatible PBX or provider

IP Whitelisting​

If your SIP system or provider uses IP-based security, you'll need to whitelist our IP ranges:

46.19.208.0/21 (46.19.208.0 - 46.19.215.254) - for incoming and outgoing traffic

For RTP media, allow the following port range:

16384-32767
note

If your system accepts traffic from all IPs, whitelisting is not required (though not recommended for security reasons).

note

This is different from traditional call forwardingβ€”instead of forwarding calls, you're configuring the number to connect directly to your SIP-enabled system or provider. Check out our blog post on Forwarding Calls vs Setting Calls.

Email Contact Methods πŸ“©β€‹

The Email tab allows you to configure email addresses that will receive system notifications, voicemails, and call recordings. These email contact methods are used throughout the system whenever you need to send notifications or recordings to users.

Email contact methods interface showing list of configured email addresses

The Email interface displays:

FieldDescription
UserName of the user this email is assigned to
EmailThe email address for notifications
StatusVerification status of the email address

Creating an Email Contact Method​

To add a new email contact method:

  1. Click the + button in the bottom right corner
  2. Configure the settings:

Creating a new email contact method

  • User: Select the user who will own this email contact
  • Email: Enter the email address that will receive notifications
Email Verification

After saving, a verification email will be sent to the provided address. The email contact method must be verified before it can receive notifications.

Domain Verification​

For organizations adding multiple email addresses under the same domain, you can verify the entire domain instead of verifying each email individually. This is configured in Settings β†’ Domains.

Domain Verification Benefits
  • Validate an entire domain once
  • Skip individual email verifications
  • Streamline adding new users
  • Perfect for larger organizations

To verify a domain:

  1. Go to Settings β†’ Domains
  2. Enter your domain name
  3. A TXT record will be generated
  4. Add the TXT record to your domain's DNS settings
  5. Click Verify to complete the process
note

DNS changes may take some time to propagate. If verification fails initially, wait a few minutes and try again.

Once a domain is verified:

  • All email addresses from that domain are automatically verified when created
  • No need for individual verification emails
  • Faster setup for new users
info

Domain verification is optional. You can still verify email addresses individually if preferred.