SIP Forwarding
SIP Forwarding connects your FlyNumber directly to an external SIP address or URI—like your own PBX, a VoIP provider, or any SIP-enabled system. Unlike PSTN forwarding which sends calls to regular phone numbers, SIP forwarding keeps everything digital, often resulting in better audio quality and more flexibility.
Choose SIP forwarding when you:
- Already have a PBX system (Asterisk, FreePBX, 3CX, etc.) and want calls to ring there
- Use a third-party VoIP provider for call handling
- Need to connect multiple phone systems together
- Want to avoid per-minute PSTN forwarding charges
See Routing Options for two ways to configure how calls reach your SIP system—either direct assignment or through call flows.
Compatible Systems
SIP forwarding works with any SIP-compliant system. Here are some popular options:
| System | Type | Notes |
|---|---|---|
| Asterisk | Open-source PBX | Most flexible, requires technical setup |
| FreePBX | GUI for Asterisk | Easier to manage than raw Asterisk |
| 3CX | Commercial PBX | Available as cloud or self-hosted |
| FreeSwitch | Open-source softswitch | High-performance, scalable |
| VoIP Providers | Varies | Check with provider for SIP URI format |
| AI Voice Platforms | VAPI, LiveKit, ElevenLabs, Retell | See transport requirements below |
Setting Up SIP Forwarding
Step 1: Gather Your SIP Details
Before configuring, you'll need the following from your SIP system or provider:
- SIP URI or domain (e.g.,
sip.yourprovider.comor an IP address) - Port number (typically 5060 for UDP/TCP, 5061 for TLS)
- Username (if authentication is required)
- Any firewall/security requirements
Step 2: Create SIP Forwarding Contact Method
- Navigate to Contact Methods in the main menu
- Select the SIP Forwarding tab
- Click the + button to create a new configuration
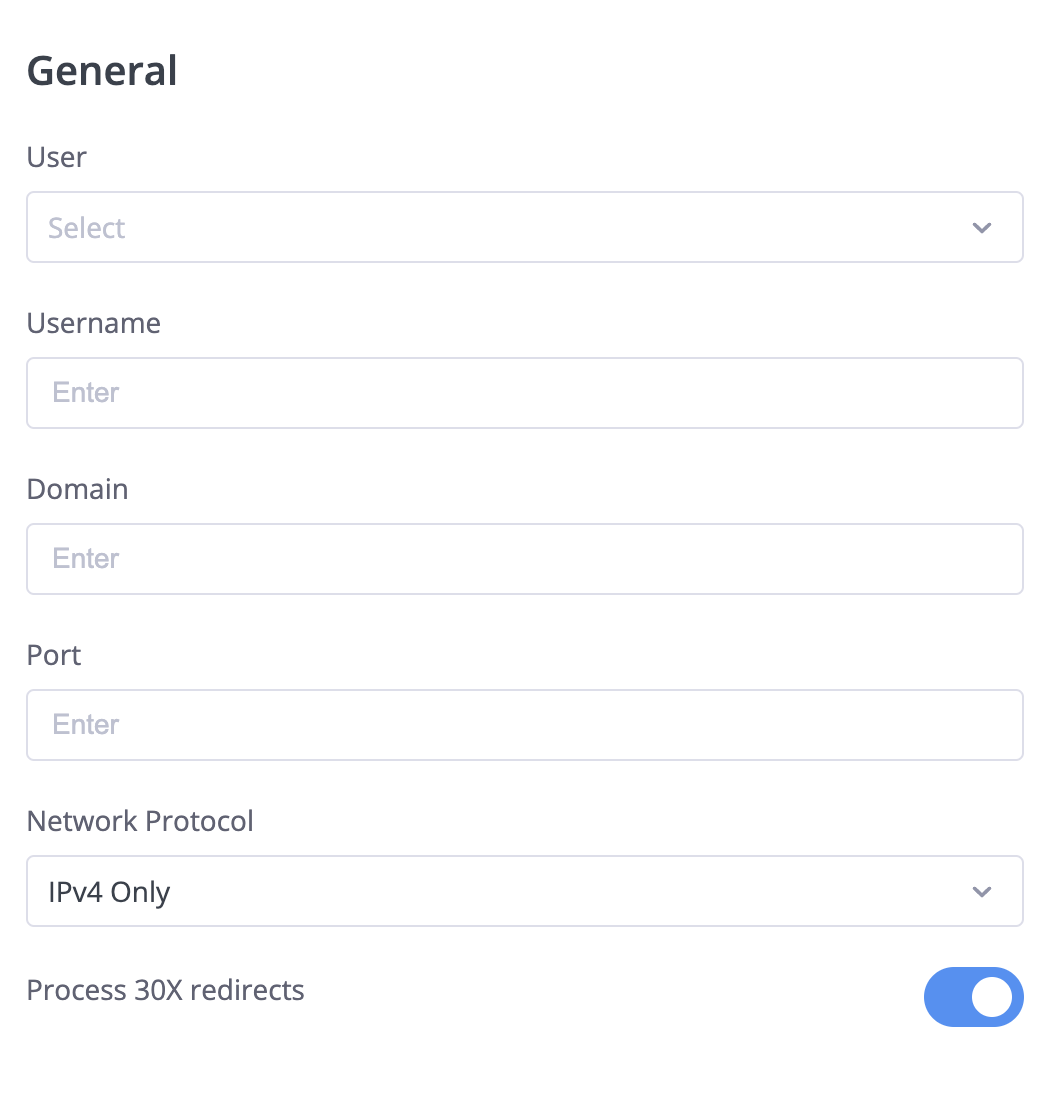
Step 3: Configure General Settings
| Setting | Description | Example |
|---|---|---|
| User | Select the user who will own this configuration | John Smith |
| Username | Your SIP username or extension | 1001 or john@sip.example.com |
| Domain | The SIP domain or IP address | sip.yourprovider.com or 192.168.1.100 |
| Port | Port number for SIP communication | 5060 (standard), 5061 (TLS) |
| Network Protocol | IP version preference | IPv4 Only (most common) |
| Process 30X redirects | Handle SIP redirects automatically | Enable if your system uses redirects |
Network Protocol Options
| Option | When to Use |
|---|---|
| IPv4 Only | Most common—use this if unsure |
| IPv6 Only | When your system only supports IPv6 |
| Dualstack | System supports both IPv4 and IPv6 |
| IPv4 Preferred | Try IPv4 first, fall back to IPv6 |
| IPv6 Preferred | Try IPv6 first, fall back to IPv4 |
IP Whitelisting
If your SIP system uses IP-based security (firewall rules, ACLs), you'll need to whitelist our IP ranges to receive calls.
FlyNumber IP Ranges
For SIP signaling (incoming and outgoing traffic):
46.19.208.0/21 (46.19.208.0 - 46.19.215.254)
For RTP media (voice audio):
Ports: 16384-32767
If you're running your own PBX behind a firewall, make sure both the SIP ports AND the RTP port range are open. Missing RTP ports is a common cause of one-way audio issues.
Example: Adding to iptables (Linux)
# Allow SIP signaling from FlyNumber
iptables -A INPUT -s 46.19.208.0/21 -p udp --dport 5060 -j ACCEPT

# Allow RTP media
iptables -A INPUT -s 46.19.208.0/21 -p udp --dport 16384:32767 -j ACCEPT
Common Setup Examples
Asterisk / FreePBX
- Create an inbound route in your Asterisk/FreePBX system
- Note your server's public IP or domain
- In FlyNumber SIP Forwarding settings:
- Domain: Your server's public IP or domain
- Port: 5060 (or your configured SIP port)
- Username: The extension or context you want calls routed to
- Whitelist FlyNumber IPs in your Asterisk firewall
3CX
- In 3CX, go to SIP Trunks and configure an inbound trunk
- Note the trunk's registration details
- In FlyNumber SIP Forwarding settings:
- Domain: Your 3CX FQDN or IP
- Port: As specified by 3CX (usually 5060)
- Username: Your SIP trunk username
- Configure inbound routing in 3CX to direct calls appropriately
External VoIP Provider
- Get your SIP URI from your provider (often in format:
username@sip.provider.com) - In FlyNumber SIP Forwarding settings:
- Domain: The provider's SIP server
- Port: As specified by provider
- Username: Your account/extension with the provider
AI Voice Platforms
AI voice agents are increasingly used for automated customer service, appointment scheduling, and 24/7 call handling. Here's what to know when connecting to these platforms:
| Platform | Transport | Notes |
|---|---|---|
| VAPI | UDP, TCP, TLS | UDP is default; see VAPI example below |
| LiveKit | UDP, TCP, TLS | Open-source agent runtime; see LiveKit example below |
| ElevenLabs | TLS required | UDP not supported; TLS is a requirement |
| Retell AI | TCP, TLS | Check their current documentation |
| Bland AI | TCP, TLS | Check their current documentation |
Setup steps:
- Get the SIP URI from your AI platform
- Configure SIP Forwarding with the platform's domain and your credentials
- Select the appropriate transport protocol (TCP can be set in the panel; TLS requires support)
- Whitelist FlyNumber IPs on the AI platform if required
You can change the transport protocol (UDP/TCP) directly in the phone system panel. For AI platforms like ElevenLabs that require TLS, contact support to enable TLS for your account.
VAPI Example
VAPI assigns each SIP trunk a unique credential ID. The SIP URI follows this pattern:
+{your_flynumber}@{credential_id}.sip.vapi.ai
To set this up in the phone system panel:
- In your VAPI dashboard, create a BYO SIP Trunk (choose the "Bring Your Own" option, not a standard credential)
- Add all 5 FlyNumber gateway IPs as separate gateways in the trunk configuration:
46.19.209.1446.19.210.1446.19.212.1446.19.213.1446.19.214.14
- For each gateway, enable Inbound Calls and Options Ping — this allows VAPI to accept and monitor incoming calls from FlyNumber
- VAPI will generate a credential ID (a UUID like
a1b2c3d4-5678-90ab-cdef-1234567890ab) - Register your FlyNumber as a phone number in VAPI and associate it with your AI assistant
- In the SIP Forwarding contact method, configure:
| Setting | Value |
|---|---|
| Domain | {credential_id}.sip.vapi.ai (use your actual credential ID) |
| Username | Your FlyNumber in E.164 format (e.g., +13025551234) |
| Port | 5060 |
- VAPI supports UDP (default), TCP, and TLS — select TCP directly in the panel, or contact support for TLS
A standard VAPI SIP trunk credential won't work with FlyNumber. You must use the BYO (Bring Your Own) SIP Trunk option and add all FlyNumber gateway IPs as gateways with inbound calls enabled. Without this, calls will return "Service Unavailable."
VAPI does not require SIP registration — the credential ID in the domain handles authentication.
LiveKit Example
LiveKit is an open-source realtime platform often used to host voice AI agents. Each LiveKit Cloud project has its own SIP URI — something like abcd1234.sip.livekit.cloud — visible on the Project settings page of the LiveKit dashboard. Calls from your FlyNumber are delivered into a LiveKit room where your agent logic picks them up.
Three pieces have to be in place on LiveKit before the call completes: an inbound trunk containing your DID, a dispatch rule that sends matching calls into a room, and an agent subscribed to that room. Missing any one will still surface as a failed call on the FlyNumber side.
Step 1 — Copy your SIP URI
In the LiveKit Cloud dashboard, open Project settings and copy the SIP URI. Drop the sip: prefix — what's left is your project's SIP endpoint (for example, abcd1234.sip.livekit.cloud).
Step 2 — Create the inbound trunk
Go to Telephony → SIP trunks → Create new trunk. On the Trunk details tab, set Trunk direction to Inbound, type your FlyNumber in E.164 into the Numbers field (comma-separated if you're attaching multiple DIDs), and leave Allowed addresses blank unless you want to lock the trunk to specific IPs.
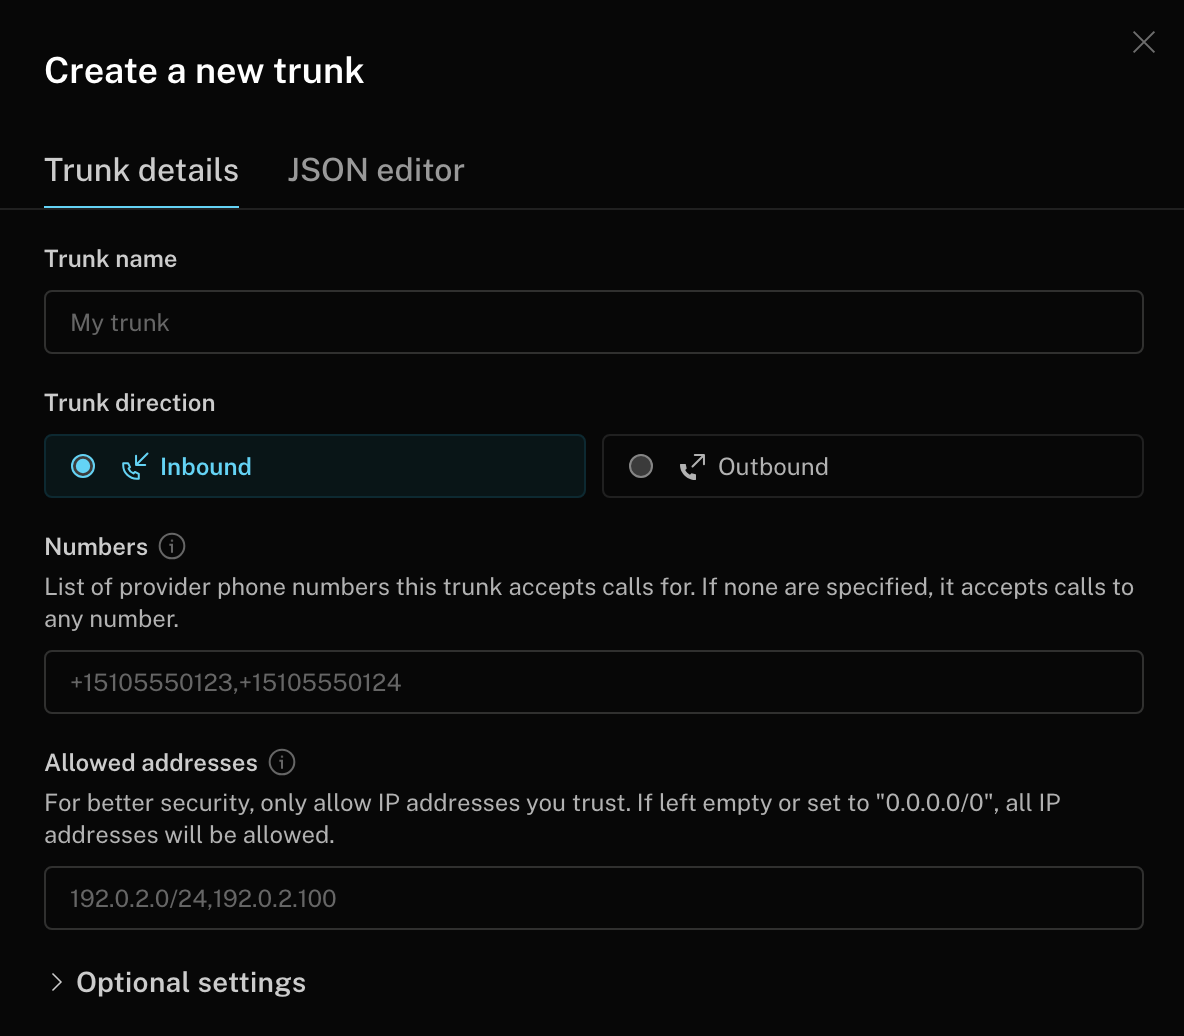
Figure: Inbound trunk configuration in the LiveKit Cloud dashboard. The Numbers field has to include the DID the call is arriving for.
Prefer the JSON editor?
Switch to the JSON editor tab on the same dialog and paste:
{
  "trunk": {
    "name": "FlyNumber inbound",
    "numbers": ["+17185301799"]
  }
}
If numbers is empty and no allowedAddresses or auth credentials are set, LiveKit rejects the trunk — a wildcard trunk always needs one of those guard rails.
Step 3 — Create the dispatch rule
Under Telephony → Dispatch rules → Create new dispatch rule, pick Individual as the rule type and set a room prefix such as call-. Each call lands in a freshly generated room with that prefix. Leave Inbound routing at Phone numbers / all trunks unless you want to scope the rule.
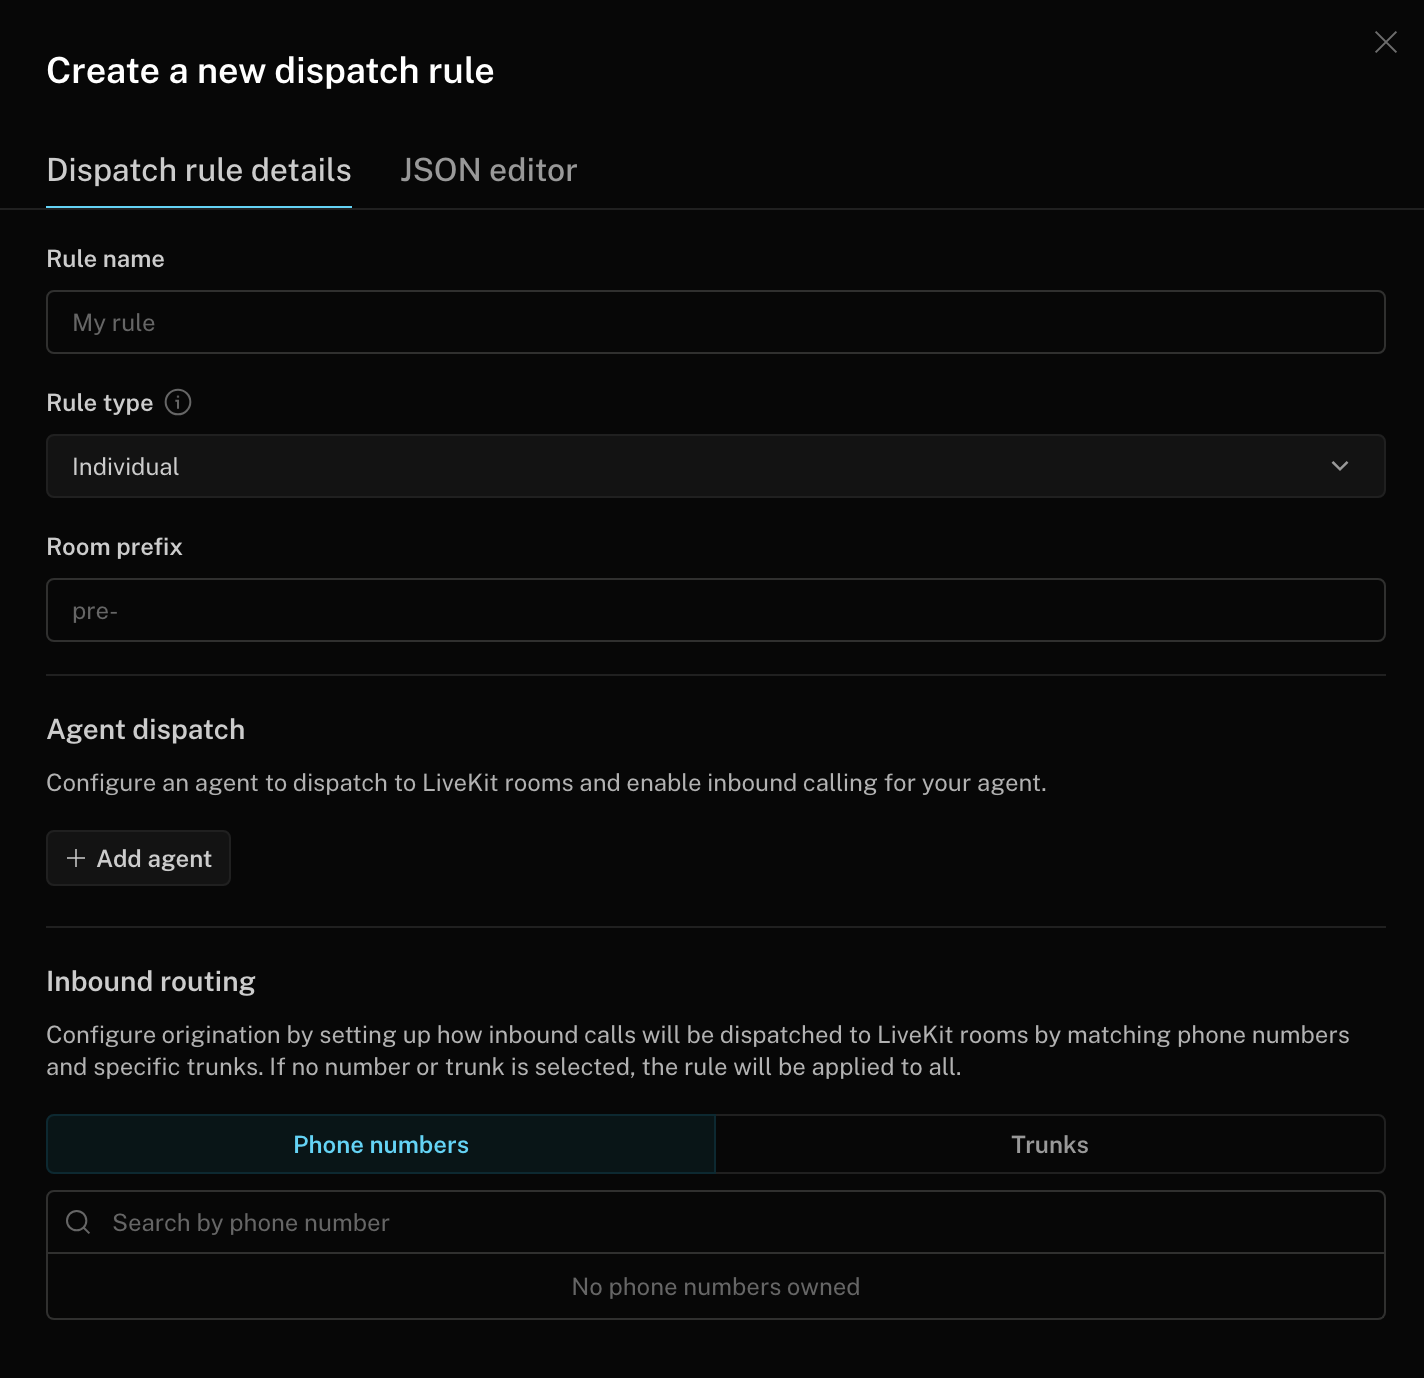
Figure: Dispatch rule creation. Without a published dispatch rule, LiveKit accepts the INVITE on the trunk and then drops the call because no room has been assigned.
Dispatch rule via JSON
{
  "name": "FlyNumber dispatch",
  "rule": {
    "dispatchRuleIndividual": {
      "roomPrefix": "call-"
    }
  }
}
Step 4 — Configure the SIP Forwarding contact method
In the phone system panel, set the SIP Forwarding fields to:
| Setting | Value |
|---|---|
| Domain | {project}.sip.livekit.cloud (the SIP URI from your Project settings) |
| Username | Your FlyNumber in E.164 format (e.g., +17185301799) |
| Port | 5060 |
LiveKit listens on UDP/5060 by default — leave the default transport alone unless you've turned on secure trunking, in which case switch the panel to TCP/TLS on port 5061 and contact support if TLS still needs to be enabled on your account.
Step 5 — Attach an agent
Publishing the trunk and dispatch rule gets the call into a LiveKit room, but nothing happens until an agent subscribes to that room and answers. Make sure your agent (custom or deployed via LiveKit Agents) is configured to handle rooms created by your dispatch rule before testing.
The LiveKit inbound trunk routes calls by matching the To: user in the SIP INVITE against the numbers array on the trunk. If the username field holds a friendly name — say, agent1 — instead of the DID in E.164 (for example, +17185301799), LiveKit returns 404 Not Found and your FlyNumber call log shows status fail, reason not found. The call won't appear in the LiveKit dashboard at all, because the rejection happens at the trunk layer before any dispatch rule runs.
The inbound trunk accepts the call. The dispatch rule places it into a room. If either is missing, the call fails — publish both before testing.
LiveKit only enforces IP restrictions when allowedAddresses is set on the inbound trunk. If you've added that restriction, include the FlyNumber IP range from the IP Whitelisting section above.
Troubleshooting
| Problem | Likely Cause | Solution |
|---|---|---|
| Calls don't arrive | Firewall blocking | Whitelist FlyNumber IPs |
| One-way audio | RTP ports blocked | Open UDP ports 16384-32767 |
| Call connects then drops | Authentication failure | Verify username and domain |
| Intermittent failures | NAT issues | Check NAT settings on your PBX |
| "404 Not Found" errors | Invalid username/extension | Verify the destination exists on your system |
Testing Your Setup
- Check connectivity: Ensure your SIP system is reachable from the internet
- Test with a simple call: Make a test call to your FlyNumber
- Check logs: Review SIP logs on your PBX for connection attempts
- Verify audio path: Confirm two-way audio works
Most PBX systems have SIP debug logging. Enable this temporarily to see exactly what's happening when calls arrive. Look for INVITE messages from our IP range.
SIP Forwarding vs PSTN Forwarding
| Feature | SIP Forwarding | PSTN Forwarding |
|---|---|---|
| Destination | SIP URI / IP address | Regular phone number |
| Audio Quality | Typically higher (digital end-to-end) | Good (converted to PSTN) |
| Per-minute cost | No additional charges | Per-minute rates apply |
| Setup complexity | Requires SIP knowledge | Simple (just enter phone number) |
| Best for | PBX systems, VoIP providers | Mobile phones, landlines |
This is different from traditional call forwarding—instead of forwarding calls through the phone network, you're routing them directly to your SIP-enabled system. Check out our blog post on Forwarding Calls vs Setting Calls.
Best Practices
- Security: Always use IP whitelisting or authentication on your PBX
- Redundancy: Consider a backup contact method in case your SIP system is unreachable
- Monitoring: Set up alerts for when your PBX goes offline
- Documentation: Keep a record of your SIP configuration for troubleshooting
- Testing: After setup, test calls from different sources to ensure reliability